Showing posts with label Hygiene. Show all posts

Thursday, 29 December 2016

Lyme Disease Prevention


Anyone who spends time outside or hikes, works, plays in wooded or grassy places is at risk of contact with infected ticks which are the main vectors (or transmitters) of Lyme disease. The risk is especially high during warm summer days. But, luckily, there are many tips that you can take to protect against tick


What is Lyme disease and how does the infection occur?


Lyme disease, also known as Lyme borreliosis, is an infectious disease caused by bacteria of the Borrelia type. The disease has been found on every continent except Antarctica.
The disease is primarily transmitted by Ixodes ticks: Ixodes ricinus (the sheep tick or castor bean tick) in Europe, Ixodes scapularis (The black-legged tick or deer tick) on the East Coast of the United States, Ixodes pacificus (Black-legged tick) on the West Coast of the USA and Ixodes persulcatus (the taiga tick) in China.


Tick has several developmental stages, but most people get Lyme from the bite of the nymphal, or immature form of the tick. Since they are so tiny and their bite is painless, so many people do not even realise they have been bitten and they don’t notice that the tick is attached to their body. The longer it stays attached, the more likely it will transmit the Lyme into your bloodstream. Usually, the infected tick must be attached for 36 to 48 hours before the bacteria can spread to the human body. Lyme disease is treatable, but it can cause serious health problems if you wait too long to get treatment.
Signs and Symptoms
The another name for Lyme is “The Great Imitator,” because its symptoms mimic many other diseases. It can produce a range of symptoms, depending on the stage of infection. Not all patients with Lyme disease have all symptoms. Also, many of the symptoms are not specific to Lyme disease but can occur with other diseases, as well. The incubation period is usually one to two weeks.
Early signs and symptoms, according to Center for Disease Control and Prevention (CDC) are rash, fever, chills, headache, fatigue, muscle and joint aches, and swollen lymph nodes. These are the symptoms of the infection that have not yet spread throughout the body. The classic sign of local infection is a circular outwardly expanding red rash. It also may be warm but is generally painless.
Later signs include severe headaches and neck stiffness, rashes on the other areas of the body, Arthritis with severe joint pain and swelling, irregular heart beats or heart palpitations, nerve pain, dizziness, shortness of breath and even the problem with short-term memory.
If you notice any of these symptoms and have had a tick bite, live in an area known for Lyme disease, or have recently travelled to an area where Lyme disease occurs, seek medical attention immediately.
How to remove a tick
CDC recommends following these steps to remove the tick attached to your body:
  1. Use fine-tipped tweezers to grasp the tick as close to the skin’s surface as possible.
  2. Pull upward with steady, even pressure. Don’t twist the tick since it can cause the mouth-parts to break off and remain in the skin. If this happens, remove the mouth-parts with tweezers. If you are unable to remove the mouth easily with clean tweezers, leave it alone and let the skin heal.
  3. After removing the tick, it is important to clean the bite area and your hands with rubbing alcohol, an iodine scrub, or soap and water.
  4. Dispose of a live tick by submersing it in alcohol, placing it in a sealed bag/container, wrapping it tightly in tape, or flushing it down the toilet. Never crush a tick with your fingers.


Tips to stay safe from infected ticks and Lyme disease
  • Perform a full body check every evening after being outdoors (even in your own garden). Ticks often hide in body folds, like underarms, in/around ears, inside the belly button, back of the knees, between the legs.
  • To avoid ticks, walk in the centre of trails and avoid walking through tall bushes or other vegetation.
  • Use repellent on clothing and tent floor. Use a repellent with DEET (on skin or clothing) or permethrin (on clothing and gear). Apply it to the skin and you’ll have a protection up to several hours.
  • Wear light-colored clothing sp the tick is more easily visible before it attaches itself.
  • Try to keep the body covered by wearing long-sleeved shirt and pants. (Possibly tucked into socks or boots), a hat and insect shields.
  • Check your clothing and pets for ticks because they may carry ticks into the house. If you find them on your clothes place it into a dryer on high heat to kill ticks.
  • Always carry tweezers. Use tweezers to grip the head and remove the tick.


Thursday, 6 October 2016

How to Make a Simple Healing Plantain Salve


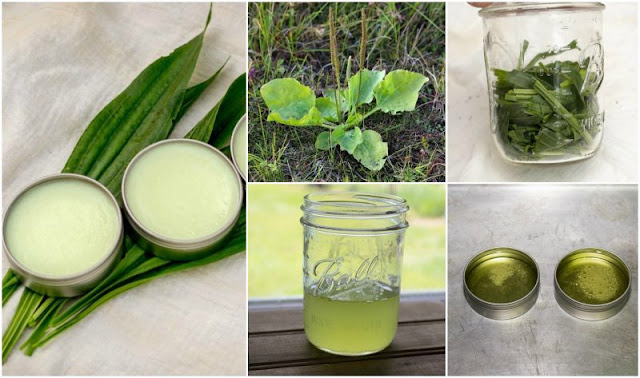
Plantain is one of those magical herbs that can be found almost anywhere. It’s used in many cultures as a “healing herb” due to its amazing healing properties. Most people view this herb as a weed. It’s very prolific and will pretty much grow anywhere. Don’t toss it in the compost just yet! Harvest the leaves to make a first aid healing salve.


How to Identify Plantain


There are two varieties of plantain commonly seen in the average yard: Plantago major, or more commonly known as broadleaf and Plantago lanceolata, also known as narrowleaf. I have mostly narrowleaf in my yard. In fact, I have patches of it growing in my garden. I just leave it and harvest from it when I need it. Both varieties have several leaves which surround the flowers and the stem at the base like flower petals.


Plantago major, rounded leaves.


Plantago lanceolata. Pointed, narrow leaves.


Remember, when harvesting plantain, make sure you are gathering them from an area not treated with chemicals.


Supplies


A handful of Plantain leaves (washed and dried)
½ oz Beeswax (pellets or shaved)
8 oz Heatproof jar (not shown)
Saucepan (not shown)


Directions

Add Plantain to the Jar


Tear the plantain leaves into smaller pieces and fill the jar half full. Pack the leaves in there tightly.


Add Coconut Oil


Add the coconut oil on top of the leaves. Put the jar in a saucepan and fill the pan about halfway up the jar with water. Set the heat on a low simmer and let the oil infuse for about two hours.

Strain


After the oil infuses for a couple of hours, strain out the plantain leaves. The oil will be a pretty light green.

Add the beeswax


Add the beeswax to the infused oil and put in back into the saucepan until the beeswax melts. The beeswax will help keep the salve firm at room temperature.

Pour into Jars or Tins


Pour the oil mixture into tins or jars—my batch made 6 oz. Let the salve cool. It will become opaque as it cools.

Add to Your First Aid Kit


Use the salve on minor cuts and burns. The coconut oil and beeswax will help keep the skin moist and the plantain will promote healing. The salve is also great for healing chapped hands and sunburned skin. Use the salve on your pets too! It’s great on sore paws.

Plantain is also great for bee and wasp stings, mosquito bites, poison ivy, eczema, psoriasis and nappy rash.

Monday, 15 August 2016

What is Bushcraft?

Bushcraft is a term used to describe skills that allow us to live comfortably in the natural world, using
natural resources in a responsible and sustainable manner. These skills were second nature to our ancestors, although many indigenous tribes and backwoodsmen still use these skills today.


A journey towards a full understanding of Bushcraft is not mere sentimentality; rather it is an empowering tool which allows us to reconnect with our roots and the natural world around us.

Bushcraft is a long-term extension of survival skills; it is about surviving and thriving in the natural environment, and the acquisition of skills and knowledge to do so. Bushcraft skills includes for example the following:

  • Dressing right and the 3-layer principle
  • Navigation with map & compass
  • Navigation by signs in nature
  • Moving with ease in nature
  • Identification and behaviour of wildlife, and especially the possibly dangerous ones
  • How to choose a camp location
  • Different type of camp and shelter construction
  • Knots
  • Making fire with simple means
  • Collecting dfferent tinder & firewood and their characteristics and uses
  • Cooking with simple means
  • Food and medical sources in nature
  • Preparation of food and water found in nature
  • How different types of food affect your body
  • Handling knife, saw and axe
  • Wood carving
  • Maintenance of knife, saw and axe
  • Laws and local customs concerning living in nature
  • First Aid
  • Medical knowledge for life in nature and for emergencies
  • Field Hygiene


These are the most important areas of knowledge and skill you should strive to learn and improve on, and it is a lifetime of study with endless possibilities. With time you will find that you need fairly little beyond a good knife and a warm sleeping bag. 

The respect gained for our unknown ancestors in the acquisition of these skills can be an important part of Bushcraft. Regarding respect and understanding, one thread of Bushcraft is also concerned with respect and understanding of the natural world, its flora and fauna and the way these elements interact.

In teaching basic Bushcraft to children we are imparting an understanding of, and respect for, our world, the changing environment, other cultures and each other - it's also great fun!

Common Myths

"There’s no such thing as Bushcraft equipment. There’s Bushcraft. And there’s equipment." - Paul Kirtley

You have to be in the woods to practise Bushcraft. What if you live in an area where there are hardly any trees, a good example is the Hebrides, please find me a tree there. As I write this I am sitting here and I am  making more nettle cordage. To me that is Bushcraft.

You have to use a tarp or make shelters in the wild or you are not practising true Bushcraft. No, Bushcraft is a skill set. if you want to use a tent, then use one. equally if you want to make a shelter make one. if you wish to use a tarp then use one.

You have to cook over an open fire. There are places where lighting fires is forbidden. In these locations my preferred method is to use a meths stove.


Thursday, 28 July 2016

How to Shit in the Woods


We all do it at home and when we're out on the trail we find ourselves needing to do it, when we would rather not. But going to the toilet in the woods is something, at some point you are going to need to do.

It's not really a subject you hear talked about on bushcraft forums, but I feel it's something we should be aware of. And hopefully if you haven't yet needed to learn about what is involved or required, this post will be of use to you.

(I now have an image of somebody, in a woodland, cross legged, hastily reading this post on their iphone...)

Anyway, lets get down to business (Sorry !... I'm sure there will be more comments like that to follow)

Toilet Kit - What To Carry


It's not a piece of kit you are going to need very often, but when you do, you'll be glad you prepared yourself in advance.

Put yourself together a simple toilet kit, with all the items required for general toilet maintenance :


  • Pack of tissues (or toilet paper in a plastic ziplock bag)
  • Lighter
  • Small folding trowel or spade
  • Hand cleanser
  • Small torch (I know, sound silly... But could be very beneficial)
  • Bag to carry everything in (The kit contents, not the... well, you know !)
  • Pack of Tissues


I don't think I need to explain what these are for, just make sure what ever you decided to use in your kit it kept in a waterproof bag for obvious reasons.

Lighter


This is used to burn the tissues once the required maintenance has been carried out. Just keeps everything more hygienic.

Small Folding Trowel


This is used to dig yourself a suitable hole in the chosen ground to receive the necessary.

Hand Cleanser


Used to clean your hands afterwards, again to ensure everything is kept hygenic. You can buy small bottles of this stuff with handy dispenser pumps. Wipes can also be used.

Small Torch


Chances are you will need to go the toilet in the night and you will need to find your way to the chosen site without having to hack your way threw brambles or get lost. Most people have their own torch, but if you have one in your kit, you know its always there.

Bag To Carry Everything In


Just keeps everything together in a handy kit, which can be stored in a rucksack pocket

If you are spending a night or two in the woods, I would advise choosing a suitable spot for your toilet setup prior to anything else you do. This way, you know everything is there ready should you be caught short. You don't want to be digging a hole with your pants round your ankles.

Chose a secluded spot, well away from camp and away from any running water, ponds or lakes.

Ensure the ground you chose is easy to dig into. You don't want to be spending hours excavating rocks and stone.

If there are several people in your camp or you like a bit of comfort, you may want to build yourself a small framework out of branches and paracord. Giving you something to lean or sit on (This post isn't very dignified I know, but needs must). You could also use a... (Dare I say it) log to sit on.

If you are just out for the day and the time arises, just find yourself a suitable spot (As above), dig yourself a hole no deeper than 6" and away you go.

The reason you shouldn't dig any deeper than 6" is that all the bacteria, that will assist in the breakdown of your waste, is present in those first 6" of the ground.

Once the operation is complete, carry out the required maintenance, drop the tissue into the hole and burn it using your lighter. Then cover everything up with the soil you have just excavated.