Showing posts with label First Aid. Show all posts

Monday, 9 January 2017

The Paradisiacal Pine Resin


Pine resin or pitch is the secretion from pine trees caused by cuts in the tree trunk or from broken limbs. The trees secrete the resin to seal up any cuts or damage to the tree. If you find yourself lost or stranded in a wilderness environment one of the best-case scenarios is that there are pine trees in the area. Pine resin exposed to the air will harden/crystallise but it can be softened for use by heating.


Medical Uses for Pine Resin


Treating wounds


A traditional use for pine resin has been as an external treatment for burns and sores. A long-term study was done by Russian scientists and published in the April 2002 issue of the “Byulleten’ Eksperimental’noi Biologii I Meditsiny” found that pine resin, as a main active ingredient in Biopin ointment, inhibited antibodies found in bodily fluids but aided healing and prevented infection by boosting cell immunity. The ointment did not cause irritation or allergic reactions.

Rheumatism

Native Americans have used pine resin to treat rheumatism because of its anti-inflammatory properties. The resin acts to remove the joint inflammation caused by rheumatism, which helps to restore movement and to alleviate pain. The Costanoan Indians gained these benefits by chewing on the gum-like resin.

Other Uses for Pine Resin


During the American Civil War, the Confederate surgeon Francis Porter used pine resin as a stimulant, diuretic, and laxative. In China,  the resin from a particular pine tree is used to treat abscesses. Resin from the spruce tree was used by colonial Americans as a cold and cough remedy, as well as straight from the tree as a cancer treatment. Physicians in colonial America also recommended tar water, or ground pine resin mixed with water, as a remedy for ulcers, smallpox, and syphilis. These are traditional holistic medicinal uses for pine resin that have not, as of yet, been confirmed by modern science as effective, but that does not mean there is no basis for some of the claims made about resin’s anti-inflammatory properties.

This may be so but the fact is that the resin once applied to a cut or scrape will inhibit the growth of bacteria because it denies the bacteria the moisture it needs to survive. Because of its very sticky nature, pine resin can be applied directly to a bleeding cut to help stem the flow of blood and close the wound up similar to stitching. Some survival experts use pine pitch in place of super glue to seal up cuts. Leave the resin in place, and reapply as needed. There have been reported cases where serious bleeding wounds have been stemmed using pine resin.

Waterproofing Shoes and Other Materials

Pine resin is essentially impervious to water so it can be used to treat objects to make them resistant to the damages caused by moisture. It can be used to seal seams, repair breaks/holes in boats, shoes and structures to prevent water leaks. In a survival situation, you may have to repair holes in boots, shoes and shelters. You can also use the resin to waterproof the lower half of your hiking shoes or boots.

The resin must be heated to liquid form so it can be applied to the material. Avoid heating the resin in a shallow container over an open flame because the flames from the fire can easily ignite the resin, which is highly flammable. Let the fire burn down to coals before heating the pitch. Find a short green stick and repeatedly strike one end to create bristles in the wood, (paintbrush) or chew on the end to break the fibres apart so they can be used to apply the pitch. Use the resin to repair holes in canvas and heavy nylon. Lay the material flat where the rip or seam is exposed. Once the resin is heated to liquid form, apply using the fibrous end of the stick.

Pine Pitch Glue

Warm the resin to liquid form and while the resin is heating, crumble some charcoal from the fire as fine as possible. Once the resin is ready, remove it from the heat and stir in the powdered charcoal. The amount of charcoal added should be about one-third as compared to the volume of the pitch. Find a solid stick with a blunt end and dip repeatedly in the mixture to form a ball of pitch on the end. You may need two sticks. This is how the glue is stored until needed. The glue will harden and to use heat until pliable.

Use the glue to form fishhooks, repair the soles of shoes and use to repair holes in water containers. Use the glue to apply feathers to homemade arrows or allow hardening on the ends of fishing/hunting spears to prevent splintering. Glue in a survival situation has unlimited uses.

Fire Starting

Pine resin is flammable and can be used to help start a fire in damp conditions. You may find yourself in a situation where all of the available wood is damp but this does not mean you have to go without a fire.

Find some hardened pine resin and some pine sticks/branches. Split the sticks and look for streaks of resin in the wood. Use magnesium shavings and a flint bar or you can use a Ferro rod to ignite the pitch. Lay some dried pine needles near the pitch and ignite the pitch. It will burn like a candle long enough to dry the needles out and you can begin adding small pieces of the pine which even if somewhat damp in the middle will burn because of the resin. Once you have, a sizable flame established you could then begin drying out other wood.

Illumination and Heat

You can use pine resin to create a lamp. Find a stone with a depression or use a clamshell or any type of shell that can be filled with resin or use a cupped shaped piece of bark. You will also need material for a wick. Use some twisted cloth or even dried moss. Fill the depression with the pitch and lay the wick material on top. You ignite the wick first, which will, in turn, ignite the resin. The resin will burn like a candle and you can feed it more resin to maintain the flame once ignited.

To use as a heat source place a metal container that has plenty of air holes in it over the ignited pitch. The metal container will absorb the heat and conduct to the surrounding area. This method will not heat a large area but will warm hands and feet in an emergency.

Considerations

In most cases, you will find damaged pine trees/broken limbs that have secreted resin. It is recommended that you first look for damaged and fallen limbs before you purposely cut into a pine tree to harvest the resin. If you have to damage the tree do it in a small area on one side of the tree only. Only take as much as you need, you must allow some resin to remain on the tree so it can protect the cut to prevent boring insects from destroying the tree.

References and Resources


Tuesday, 3 January 2017

Plant Lore: Cattail

The most common cattail (Typha latifolia) that we all recognise is a tall plant often found growing in dense stands in wetland areas, such as marshes and bogs. Various other species of cattail are found worldwide.


General Characteristics:


The very recognisable and familiar cattail flowers begin as green spikes (female parts) with loose, dangling hairs containing pollen (male parts) above that. Once fertilised, the female parts turn dark brown and the male parts fall away, leaving a stiff, pointed spike. The leaves are very tall and narrow (grass-like). A tall marsh plant, that grows in dense groups. Early in the year, the top of the head has a slender tail of lighter coloured staminate flowers, the lower dark brown area being tightly packed pistillate flowers. In fact, the flowers are very prolific, one stalk will produce an estimated 220,000 seeds. Even with this number of seeds, cattails colonise by sending up clones from the creeping rhizomes. It has been recorded that a cattail marsh can travel up to 17 feet in a year with prime conditions through the cloning process. Colonisation can happen quickly, as one new seed produces a plant, that new shoot in its first year will send out rhizomes for ten feet in all directions and can produce 100 clones in that first growing season. Cattails can reach heights 3-9 feet.

There are some poisonous look-alikes that may be mistaken for cattail, but none of these look-alikes possesses the brown seed head.

Blue Flag (Iris versicolor) and Yellow Flag (Iris pseudoacorus) and other members of the iris family all possess the cattail-like leaves, but none possesses the brown seed head. All members of the Iris family are poisonous. Another look-alike which is not poisonous, but whose leaves look more like cattail than iris is the Sweet Flag (Acorus calumus). Sweet Flag has a very pleasant spicy, sweet aroma when the leaves are bruised. It also does not possess the brown seed head. Neither the irises nor cattail has the sweet, spicy aroma. I have seen large stands of cattails and sweet flag growing side by side. As with all wild edibles, positive identification is essential. If you are not sure, do not eat it.

The list of uses for this plant is quite extensive and it has been said that if a lost person has found cattails, they have four of the five things they need to survive: Water, food, shelter and a source of fuel for heat—the dry old stalks. The one item missing is companionship. Some of the plant's major uses are:


Food source


The stems a few inches above the soil line in early summer are young and tender and can be peeled and eaten raw or boiled. The roots are great as well, simply pull the lower stalks until the roots break free, peel and eat raw or boil. The cattail will also develop flower heads that can be eaten by roasting as if you would an ear of corn. By mid to late summer, pollen will collect on the heads and it is easily shaken loose into any container to be used like flour to make bread, pancakes and can be used for thickeners in gravies and sauces. The roots in late fall and early winter can be mashed and soaked in water to release the starch. The starch will settle on the bottom and will resemble wet flour. Drain the water off and make bread, by adding a little pollen or add to clean water to make soup. Cattails are an ideal survival food because they are easily recognisable and grow practically anywhere there is water.

Shelter Material


The green leaves can be cut and woven together into shingle like squares for covering a shelter roof. The material will provide protection from the rain, snow and the wind even after it has dried. Weave a sleeping mat by making two long mats. Connect the mats on one side so it can be folded like a sleeping bag. Before folding over fill one side with pine boughs or other material suitable for sleeping on and then fold the empty half over and tie off so the “stuffing” is secured inside. You can fold the mat up and carry it with you if you have to break camp for another location.

Medicinal Uses


Cattails are truly a survival plant in the truest sense of the word. They not only provide, food, material for shelters and cordage cattails have medicinal uses as well. To treat burns, scrapes, insect bites and bruises split open a cattail root and “bruise” the exposed portion so it can be used as a poultice that can be secured over the injured area.

The ash of burnt cattails is said to have antiseptic properties and many people have used the ashes to treat wounds and abrasions. If you look closely at the lower stems you will notice an amber or honey like substance that seeps from the stem, use this secretion to treat small wounds and even toothaches, because it also has antiseptic properties.

Baskets or Packs


You can get creative and weave baskets or small packs for carrying food or other items. Cross a number of leaves together and once you have the base the size you want you would fold the pieces up and then weave around the sides to secure the shape. You can easily weave handles or straps into the basket/pack. The basket will become stronger as the cattail leaves dry and harden.

Cordage


Peel strips from the leaves and allow them to dry somewhat. Once dried braid at least three strips together to create a line for fishing or use in shelter building.

As you can see there are many edible and useful parts of the cattail, but now we are going to take a look at the uses for the fluff from the seed head:


Tinder


Once shredded from the seed head, the cattail fluff expands into a soft, string-like material – perfect for trapping sparks to create a campfire. Ensure you mix some other material with it as well. However, cattail fluff can burn very quickly, sometimes too quickly!

Charcloth


For starting a fire with old-fashioned flint and steel sets, or when using a magnifying glass to intensify the sun’s rays to start a fire, Charcloth is an ideal product to use.

The steps to create this handy material are quite simple; just pack a metal box with cattail fluff, pierce the box with a nail to make a small hole, then place the box into a campfire for 5 minutes. Use a stick or rod to remove the box from the campfire after some time, then let it cool. Now you have a premium Charcloth!

Lamp wicks


The first people to roam America were the Paleoindians, and they had many resourceful ways to survive in the harshest conditions of the New World.

A simple oil lamp was one way that they lit their caves and rock shelters. A pinch of cattail fluff rising up out of oil made for a fine wick. Try it yourself! If for any reason you don’t have any ‘mammoth’ fat, try a block of lard with a cattail wick.

Insulation


You can use cattail fluff inside any item for warmth, such as your hat, some of your clothes, or your footwear. It’s like a plant-based variety of insulation.

Insect Repellent


In certain situations, the smoke from the seed head of a smouldering cattail can be a substitute for insect repellent. On a fire safe surface, put the smoking cattail head upwind from your location and the bug repelling smoke will waft over you for 20-30 minutes. You can even leave the seed head attached to the stalk and stick it in the ground as a stand.

Have you tried using cattail for any projects? If so, please tell me what you did by leaving a comment


Thursday, 29 December 2016

Lyme Disease Prevention


Anyone who spends time outside or hikes, works, plays in wooded or grassy places is at risk of contact with infected ticks which are the main vectors (or transmitters) of Lyme disease. The risk is especially high during warm summer days. But, luckily, there are many tips that you can take to protect against tick


What is Lyme disease and how does the infection occur?


Lyme disease, also known as Lyme borreliosis, is an infectious disease caused by bacteria of the Borrelia type. The disease has been found on every continent except Antarctica.
The disease is primarily transmitted by Ixodes ticks: Ixodes ricinus (the sheep tick or castor bean tick) in Europe, Ixodes scapularis (The black-legged tick or deer tick) on the East Coast of the United States, Ixodes pacificus (Black-legged tick) on the West Coast of the USA and Ixodes persulcatus (the taiga tick) in China.


Tick has several developmental stages, but most people get Lyme from the bite of the nymphal, or immature form of the tick. Since they are so tiny and their bite is painless, so many people do not even realise they have been bitten and they don’t notice that the tick is attached to their body. The longer it stays attached, the more likely it will transmit the Lyme into your bloodstream. Usually, the infected tick must be attached for 36 to 48 hours before the bacteria can spread to the human body. Lyme disease is treatable, but it can cause serious health problems if you wait too long to get treatment.
Signs and Symptoms
The another name for Lyme is “The Great Imitator,” because its symptoms mimic many other diseases. It can produce a range of symptoms, depending on the stage of infection. Not all patients with Lyme disease have all symptoms. Also, many of the symptoms are not specific to Lyme disease but can occur with other diseases, as well. The incubation period is usually one to two weeks.
Early signs and symptoms, according to Center for Disease Control and Prevention (CDC) are rash, fever, chills, headache, fatigue, muscle and joint aches, and swollen lymph nodes. These are the symptoms of the infection that have not yet spread throughout the body. The classic sign of local infection is a circular outwardly expanding red rash. It also may be warm but is generally painless.
Later signs include severe headaches and neck stiffness, rashes on the other areas of the body, Arthritis with severe joint pain and swelling, irregular heart beats or heart palpitations, nerve pain, dizziness, shortness of breath and even the problem with short-term memory.
If you notice any of these symptoms and have had a tick bite, live in an area known for Lyme disease, or have recently travelled to an area where Lyme disease occurs, seek medical attention immediately.
How to remove a tick
CDC recommends following these steps to remove the tick attached to your body:
  1. Use fine-tipped tweezers to grasp the tick as close to the skin’s surface as possible.
  2. Pull upward with steady, even pressure. Don’t twist the tick since it can cause the mouth-parts to break off and remain in the skin. If this happens, remove the mouth-parts with tweezers. If you are unable to remove the mouth easily with clean tweezers, leave it alone and let the skin heal.
  3. After removing the tick, it is important to clean the bite area and your hands with rubbing alcohol, an iodine scrub, or soap and water.
  4. Dispose of a live tick by submersing it in alcohol, placing it in a sealed bag/container, wrapping it tightly in tape, or flushing it down the toilet. Never crush a tick with your fingers.


Tips to stay safe from infected ticks and Lyme disease
  • Perform a full body check every evening after being outdoors (even in your own garden). Ticks often hide in body folds, like underarms, in/around ears, inside the belly button, back of the knees, between the legs.
  • To avoid ticks, walk in the centre of trails and avoid walking through tall bushes or other vegetation.
  • Use repellent on clothing and tent floor. Use a repellent with DEET (on skin or clothing) or permethrin (on clothing and gear). Apply it to the skin and you’ll have a protection up to several hours.
  • Wear light-colored clothing sp the tick is more easily visible before it attaches itself.
  • Try to keep the body covered by wearing long-sleeved shirt and pants. (Possibly tucked into socks or boots), a hat and insect shields.
  • Check your clothing and pets for ticks because they may carry ticks into the house. If you find them on your clothes place it into a dryer on high heat to kill ticks.
  • Always carry tweezers. Use tweezers to grip the head and remove the tick.


Thursday, 6 October 2016

How to Make a Simple Healing Plantain Salve


Plantain is one of those magical herbs that can be found almost anywhere. It’s used in many cultures as a “healing herb” due to its amazing healing properties. Most people view this herb as a weed. It’s very prolific and will pretty much grow anywhere. Don’t toss it in the compost just yet! Harvest the leaves to make a first aid healing salve.


How to Identify Plantain


There are two varieties of plantain commonly seen in the average yard: Plantago major, or more commonly known as broadleaf and Plantago lanceolata, also known as narrowleaf. I have mostly narrowleaf in my yard. In fact, I have patches of it growing in my garden. I just leave it and harvest from it when I need it. Both varieties have several leaves which surround the flowers and the stem at the base like flower petals.


Plantago major, rounded leaves.


Plantago lanceolata. Pointed, narrow leaves.


Remember, when harvesting plantain, make sure you are gathering them from an area not treated with chemicals.


Supplies


A handful of Plantain leaves (washed and dried)
½ oz Beeswax (pellets or shaved)
8 oz Heatproof jar (not shown)
Saucepan (not shown)


Directions

Add Plantain to the Jar


Tear the plantain leaves into smaller pieces and fill the jar half full. Pack the leaves in there tightly.


Add Coconut Oil


Add the coconut oil on top of the leaves. Put the jar in a saucepan and fill the pan about halfway up the jar with water. Set the heat on a low simmer and let the oil infuse for about two hours.

Strain


After the oil infuses for a couple of hours, strain out the plantain leaves. The oil will be a pretty light green.

Add the beeswax


Add the beeswax to the infused oil and put in back into the saucepan until the beeswax melts. The beeswax will help keep the salve firm at room temperature.

Pour into Jars or Tins


Pour the oil mixture into tins or jars—my batch made 6 oz. Let the salve cool. It will become opaque as it cools.

Add to Your First Aid Kit


Use the salve on minor cuts and burns. The coconut oil and beeswax will help keep the skin moist and the plantain will promote healing. The salve is also great for healing chapped hands and sunburned skin. Use the salve on your pets too! It’s great on sore paws.

Plantain is also great for bee and wasp stings, mosquito bites, poison ivy, eczema, psoriasis and nappy rash.

Wednesday, 21 September 2016

Preparing Acorns for Food and Medicinal Uses


I don't know why I have been ignoring acorns all this time. But this year, out of no-where, it suddenly struck me that I should give them a try. Oaks are quite plentiful in my region and acorns are not in short supply. This is how I unexpectedly found myself filling my pockets with acorns earlier this fall. Acorns actually make for easy foraging - their size (at least that of the more common species) is such that bags can be filled rapidly without too much effort.

But before you start picking, it may be worth your while to familiarise yourself with the different species that grow in your area. Usually, where there is one type of oak there are several. Oaks and acorns come in many different varieties, shapes and sizes and not all are equally good for eating, despite the fact that all of them are edible.

Acorns are rich in tannins, a bitter, acrid substance which has been used for tanning animal hides. Tannins are very astringent and in large doses they are toxic to the kidneys, liver and digestive tract. They also interfere with the absorption of iron. This is why foragers prefer to search out species of oak that are naturally sweeter and lack the high levels of tannins. Fortunately, in most parts of Europe the species that has the lowest tannin concentration is also one of the most widespread. In the United States there is a greater range of species and all of them, even the bitterest have been used for food by Native people.

Acorns represent one of the biggest (and most widespread) calorie jackpots in the annual wild plant food harvest, if you can beat the squirrels to them. These high calorie nuts were a staple crop to many of our ancestors around the Northern Hemisphere and we can still rely on them for food today. Coming in at 2,000 calories per pound, this abundant food crop is too valuable to ignore. You can even use them to make medicine. Here’s how.

Acorns for Food


An occupational hazard of collecting acorns is collecting Acorn Weevils…keep an eye out and do your best to leave any with tiny black holes. A good trick on getting your harvest home is to chuck everything in a sink of cold water to see if any acorns float, a high percentage of those that do have been eaten by Weevils, discard these ones.

To prepare palatable acorns, crack them out of their shell and break any large pieces into “pea-sized” chunks. Then soak these acorn chunks in cold, warm, or even hot water to remove the bitter and irritating tannic acid. Note that some books instruct us to boil acorns, but this locks in some of the bitterness. You’ll have the best results with warm water.

Soak the acorns for a few hours. If the water was safe to drink, taste a piece of acorn to see if it is still bitter. If you don’t like it, dump off the water (which should be brown, like tea), add fresh warm water, and soak the acorn pieces again for a few hours. Repeat this a time or two, or three depending on the acorn’s bitterness. Once they taste okay (in other words, bland), let them dry out for a few hours. Then you can run them through a grain grinder, flour mill, or use the classic mortar and pestle to make acorn flour. Add this flour to existing recipes; or try your hand at making acorn porridge, cookies, crackers, or biscuits.  

Acorns for Medicine


Remember the brown tea-like water you poured off the first soaking of acorns? Well, don’t throw it out just yet. Even though it seems like we’re brewing up some kind of medieval potion, crushed acorns and hot water can provide a great remedy for inflamed and irritated skin, as well as toothaches. You can use the first water you pour off from the process of soaking described above. Or you can make a liquid that’s more concentrated by boiling crushed acorns (shells and all) in a pot of water. A handful of crushed acorns in one pint of water will make a small batch of strong medicinal fluid. Soak a clean cloth in this dark brown water, and apply the wet cloth to rashes, ingrown toenails, haemorrhoids, and any other inflamed skin ailment. Leave the cloth in place, and repeat this treatment as needed. For tooth troubles, simply swish the bitter water in your mouth, holding it in there as long as you can. Repeat as need, but do not swallow, as this acidic water will give you an upset stomach.

Ever try to eat acorns without leeching the bitterness? Or perhaps used them as a flour or animal feed? Please tell me about your experience in the comments.

Monday, 15 August 2016

What is Bushcraft?

Bushcraft is a term used to describe skills that allow us to live comfortably in the natural world, using
natural resources in a responsible and sustainable manner. These skills were second nature to our ancestors, although many indigenous tribes and backwoodsmen still use these skills today.


A journey towards a full understanding of Bushcraft is not mere sentimentality; rather it is an empowering tool which allows us to reconnect with our roots and the natural world around us.

Bushcraft is a long-term extension of survival skills; it is about surviving and thriving in the natural environment, and the acquisition of skills and knowledge to do so. Bushcraft skills includes for example the following:

  • Dressing right and the 3-layer principle
  • Navigation with map & compass
  • Navigation by signs in nature
  • Moving with ease in nature
  • Identification and behaviour of wildlife, and especially the possibly dangerous ones
  • How to choose a camp location
  • Different type of camp and shelter construction
  • Knots
  • Making fire with simple means
  • Collecting dfferent tinder & firewood and their characteristics and uses
  • Cooking with simple means
  • Food and medical sources in nature
  • Preparation of food and water found in nature
  • How different types of food affect your body
  • Handling knife, saw and axe
  • Wood carving
  • Maintenance of knife, saw and axe
  • Laws and local customs concerning living in nature
  • First Aid
  • Medical knowledge for life in nature and for emergencies
  • Field Hygiene


These are the most important areas of knowledge and skill you should strive to learn and improve on, and it is a lifetime of study with endless possibilities. With time you will find that you need fairly little beyond a good knife and a warm sleeping bag. 

The respect gained for our unknown ancestors in the acquisition of these skills can be an important part of Bushcraft. Regarding respect and understanding, one thread of Bushcraft is also concerned with respect and understanding of the natural world, its flora and fauna and the way these elements interact.

In teaching basic Bushcraft to children we are imparting an understanding of, and respect for, our world, the changing environment, other cultures and each other - it's also great fun!

Common Myths

"There’s no such thing as Bushcraft equipment. There’s Bushcraft. And there’s equipment." - Paul Kirtley

You have to be in the woods to practise Bushcraft. What if you live in an area where there are hardly any trees, a good example is the Hebrides, please find me a tree there. As I write this I am sitting here and I am  making more nettle cordage. To me that is Bushcraft.

You have to use a tarp or make shelters in the wild or you are not practising true Bushcraft. No, Bushcraft is a skill set. if you want to use a tent, then use one. equally if you want to make a shelter make one. if you wish to use a tarp then use one.

You have to cook over an open fire. There are places where lighting fires is forbidden. In these locations my preferred method is to use a meths stove.


Monday, 18 July 2016

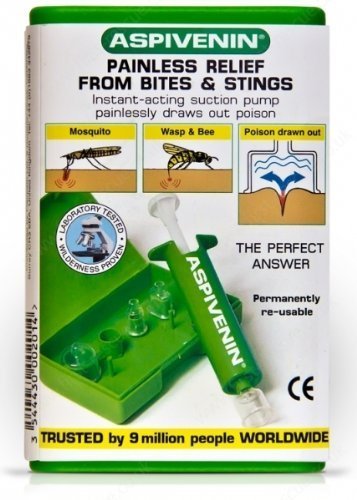
Review: Aspivenin


The entire insect world seems to regard my flesh as a rare delicacy so I'm always being stung when I go away. What can I do about it?

The ingeniously simple and practical Aspivenin is a small syringe-like pump with four tiny interchangeable cups. When you are stung, you place an Aspivenin cup over the skin, pull out the plunger and then slowly push it all the way back in. Doing so creates a vacuum under the cup - and this is strong enough to miraculously draw the sting back out while leaving the skin intact.

Q. How can you be sure it's got all the sting out?

A. Because you can see it. A tiny droplet of liquid appears on your skin - usually it is a slightly yellow colour, but it depends which species has just made a bee-line for you. With the sting extracted, the skin calms down and any minor swelling quickly goes away. The cups should be rinsed afterwards and the Aspivenin is safe to use on children. Fortunately, once "cocked" the Aspivenin is even easy to use one-handed - and it works in any temperature from -5 to +50 C. The Aspivenin is claimed to be effective on stings from bees, wasps, hornets, mosquitoes, vipers, scorpions, harvest ticks, jelly fish, weevers...

Q. I'm beginning to itch. Who came up with this gizmo?

A. Frenchman André Emerit, a lifelong inventor who had entered and won a competition to make a mini-pump. He died in 1997, aged of 85, and his son Michael is said to have had a hand in getting the Aspivenin into commercial production as a medical aid.

Q. Will it sting my pocket?

A. Hardly. It costs between £16.00 and £20,00 depending where you shop online

Friday, 17 June 2016

Blister First Aid and Treatment

Not having the proper footwear is the main cause of blisters on your feet. Perhaps your socks are too large or your shoes are either too large or too small. The friction blister is a very common complaint.

Blisters are commonly found with frostbite, burns as well as caused by friction. We do address burn blisters under first aid for burns. Treatment is very similar, regardless of the cause.


Prevention of Blisters


One should always have good fitting socks and shoes before going on long treks in the outdoors. If not, blisters can easily occur. They are commonly seen in sporting activities.


Blister Treatment


Mismanaged blister treatment is a common occurrence. Many individuals believe that you should not pop or remove a blister. This is still a controversial issue. As a full time carer, I have had good success with the following treatment: If you have medical care that is close by, go ahead and pop the blister and remove it. The skin is dead. It is not painful. After cutting the blister away, irrigate the wound by cleaning with water. Apply a topical antibiotic such as Bacitracin and bandage. Adhere to wound care instructions such as keeping the wound clean and covered during the day, leaving it open to air at night. Watch for signs of infection. The times when you want to leave a blister intact is when you are a long way from medical care. Blisters act as a nice shield. These will usually rupture anyway. Some individuals believe you should go ahead and rupture the blister, but leave the skin intact as a protective layer and shield against infection. However this carer has also seen infections occur as a result of this treatment plan, hence the need to remove the overlying skin.

I have seen numerous athletes try to play through the pain after the blister has ruptured. I have seen secondary infections that occur when these are not treated, and they continue to play football, cricket or track, and more blisters develop in the area. Of course the ideal treatment is to stay off of the foot, decrease your running for at least 7-10 days until you get good healing of the area.

Thursday, 16 June 2016

Bee Sting First Aid


Insects in general cause a great deal of undue anxiety and many people are frightening to the point of not wanting to explore the outdoors. This is understandable if they have had a severe or at worst, an anaphylactic reaction from bee or wasp stings. Bee and wasp stings account for the majority of individuals who experience severe allergic reactions. However the vast majority only have local reactions. Please remember that honeybees can only sting once. After they sting you, they fly away and die because they have basically eviscerated themselves and they usually leave part of their intestine along with the stinger in the wound, as opposed to hornets and yellow jackets which can sting numerous times. Initial signs and symptoms generally include immediate pain, followed by redness and a wheal will develop at the sting site. These can get rather large, even larger than a 10p, with redness. This is a histamine reaction, or the body’s reaction to the venom. It is not a reaction from the amount of poison that was delivered, a common myth.


Bee Sting Treatment


Treatment for the majority of stings is very simple and consists of cool compresses to the area, no ice. You want to remove the stinger by either pulling it out or  scraping it. There was a lot of controversy regarding this, that if you pulled out a stinger from a bee that is still pumping venom, you will induce more venom. This has been studied at length and is also a myth. It does not matter how you get the stinger out as long as you remove it. The reason for that is it can cause secondary infection.


Antihistamines are helpful. Diphenhydramine is always in my pack when I am in the outdoors. You can also pick up other antihistamines, for example an H2 Blocker like Tagamet (generic name Cimetidine) which can also be helpful. You want to observe the individual for at least 24-hours. Most anaphylactic-type reactions will occur within the first 3-4 hours, usually within the first 30 minutes, where you will see an individual with generalized massive hives, itching, shortness of breath and difficulty breathing. These are medical emergencies and patients need to be transported immediately or as soon as possible as they are potentially life-threatening. The question now arises, should everyone carry an Epi-pen? Anyone can have a severe allergic reaction at any point in their lifetime, whether to a bee sting or to a new shampoo or soap product. If one is spending quite a bit of time in the outdoors or you know you are going to be out a week or so, even 3 days out to the mountains or a remove area, it would be very advisable to have an epi-pen. A Boy Scout leader once indicated to me that none of the members of his troop had a history of anaphylactic reaction. They were going out to Utah for a week that summer. He was asking whether he should have an epi-pen available. I told him absolutely yes, as we don’t know if one of these children will have an allergic reaction should they get stung by a bee, and why take the risk? Epi-pens are auto-injectible pens which anyone can use. They do need a prescription written in order to be carried. They are very easy to use. However it is important that individuals know when to use them, and they don’t just inject every time someone has a bee sting. They should only be used when there are signs and symptoms of a severe, anaphylactic type reaction.