Showing posts with label Survival. Show all posts

Friday, 16 June 2017

How to Identify Amanitas


The Amanita Family

The Amanita Family is certainly one of the most interesting for foragers, and definitely one that any novice forager should quickly familiarise themselves with.

The Amanita family contains roughly 24 species in Britain and some are among the most deadly poisonous mushrooms in the world.

Of the 24 at least 6 are listed as deadly among the books I own. Those are The Death Cap, The Destroying Angel, The Gemmed Amanita, The Panther Cap, The Spring Amanita and The Fools Mushroom. Not all of those are pictured here.


Some Amanitas are edible but not mushrooms we consider safe for the novice forager. The most important thing for any novice forager to learn is how to recognise the Amanitas and what edibles they can look like.

Before even considering eating any of the edible members of this family, or picking any mushroom that can look similar to them, it is worth noting that there is no known cure for the combination of toxins found in some Amanitas. 


A slow death is likely if you ingest these mushrooms, accompanied by terrible pain and extreme gastric problems as they destroy your internal organs.

Identifying all the Amanitas can be tricky but there are some key characteristics most share that you should look out for.

How to Identify the Amanitas.

1. All have white gills and white spores. 

2, All normally have a bulbous base, so when identifying mushrooms you don't know; it is important to get to the very base of the stem or stipe to see what's there. This can often be buried under the forest detritus or even the mud itself.

3, Many grow from an egg sack like structure called a volva. The volva can closely resemble other young mushrooms such as puffballs or stinkhorn eggs or even young Agarics (field mushroom types), so this should be taken into consideration when harvesting any of those edible mushrooms.

4, The remains of the volva can often be seen on the top of the cap of the mushroom, particularly the death cap, which often has the white remains of the volva left.

5, Most have a skirt, and the skirts can either be smooth or striated. Look closely at the skirt characteristics when you start to try to identify the individual species within the family. 

The Grisettes; a subspecies of the Amanitas generally do not have skirts.  Be aware that the skirt on a mushroom can sometimes come off due to weathering or by being brushed or blown off.

6. Many have speckles or spots on the top as with the archetypal gnome seat, The Fly Agaric or Amanita muscaria pictured on the right. This is a very interesting mushroom, and though it is used recreationally it falls into the deadly mushroom category as it has been known to cause deaths. 

Each Fly Agaric mushroom has an unknown quantity of the poison muscarine in it which can have fatal effects.

Different members of the family have slightly different types of speckles, some are scales left from when the mushroom broke through its egg, some seem to be flaky and some are much more like a calcite build up on top of the cap. 

All of these different types of 'speckles' can be washed off by the rain, and some of the most deadly members of the family often have no speckles at all.

Mushrooms that can be confused with Amanitas

Puffballs; small white puffballs can resemble Amanita eggs, always cut your puffballs in half and make sure there isn't a little mushroom inside to be sure you don't have an Amanita.

Young Field Mushrooms or other Agarics; If you pick a young Agaric before the cap has opened then you are running the risk of it being an Amanita. Check the colour of the gills, as with the Amanitas they will always be white and with young Agarics, they will always be off-white to pink.

Russulas; The Gemmed Amanita on the right can look like the common yellow Russula if all of the speckles have been washed off the top. Check the shape and texture of the stem. The Russula stem will be straight and white like a stick of chalk and have no skirt. The Amanita stem will be bulbous at the base and probably have a skirt.

Parasols; there are a number of superficial similarities between the Parasol and the Amanita family. Check the cap of your Parasol to make sure it is actually scaly rather than having scales you can brush off.

Edible Amanitas; the most likely mistake to make is when picking other edible members of the Amanita family, so if you are going to try experimenting with edible Amanitas extreme caution is required. Never eat any mushroom from this family unless you are 100% sure of what it is and that it is edible. Never eat any members of this family raw.

Saturday, 11 March 2017

How to Build An Emergency Shelter

You could be out in the woods you discover that you are lost. Or perhaps you’re driving along a rural road and your car stalls or gets a flat tyre. Maybe you’re doing some canoeing and it overturns on the lake, forcing you to swim to shore after which you find you’re many miles away from your camp and anyone else.

Regardless of the situation, when you’re stuck outdoors away from civilisation, lodging, or nearby help, you may need to build an emergency shelter. Especially when the weather conditions are cold and wet, or will be soon due to an approaching storm or nightfall, an emergency shelter could literally be a life saver. Here’s how to build a good one that will offer you protection from the elements and hold you over temporarily until you can get to safety or get rescued.

State of mind


Before you get started on a suitable shelter, though, you must be in the right frame of mind. Okay, so you’ve gotten into a sticky situation. The first thing you must resist is the urge to panic or make a hasty decision that makes a bad situation worse. Rather, do this instead:

  • Stop and breathe slowly for a couple of minutes. Accept the situation as it is, and calm yourself. Think clearly and rationally.
  • Assess your surroundings. What kind of environment are you in? Forest? Mountains? Countryside? What’s the weather and temperature like? How much daylight remains?
  • What materials do you have with you? What’s out in the environment that you can use?

Choose a suitable location


Now that you’ve gotten your mental bearings, you can begin planning your shelter. And that first requires picking a location. This is the part where the evaluation you performed earlier comes into play. You’ll want to set up your shelter on dry ground, out of the wind if possible, and near resources such as trees and bushes. If a stream of clean drinking water is nearby, even better.

Assess your materials


The purpose of an emergency shelter isn’t to be all fancy and super comfortable. It’s to get you through the night alive and stave off hypothermia. So don’t worry about having the perfect materials lying around, since all you need is the basics. First, check your own belongings. Do you have a weather parka/poncho? Emergency blanket? Any kind of tarp or plastic bags that can act as covering?

Assess your environment


Now, look at the surrounding environment. Do you have tree branches, boughs, ferns, dead wood, leaves, and bushes around? Is there any “natural” shelter around such as an overhang, rock wall, or cave that can act as part of, or all of the shelter?

Decide what kind of shelter to build


After you’ve evaluated your location, materials, and environment, now it’s time to decide what kind of shelter to build. Keep in mind that it may be cold, dusk may be approaching, or you may be tired, hurt, or ill. So again, nothing fancy, just a quick overnight shelter to protect from the elements. There are dozens of outdoor shelter types you could build ranging from simple to complex, but the one of the quickest to construct is a basic double lean-to or A-frame shelter.


The A-frame shelter, 


For an A-frame, you’ll need to start with a long, thick branch or log about one and a half times your body length. This is the backbone of your shelter. Then, either prop one end against something sturdy like a fallen tree or an upright tree at a low angle and the other end into the ground. Next, place smaller branches along the sides to form “ribs.” The ribs or the walls should be lined up along both sides so that the skeleton of the shelter takes on an “A” shape.

Once the frame of the shelter is erected, you then begin filling in the space with leaves, branches, moss, and ferns. Keep working until you have the entire shelter covered, as you’ll need to keep the wind and rain out, and also trap heat from a fire if you can manage to build one. If you have a tarp, garbage bag, or poncho, you can drape it over the shelter for added insulation. And make the shelter as compact as possible, to help retain body heat. Of course, if there are others with you, then alter the size accordingly.

Try to be comfortable


You’ve got a shelter that should keep the wind, rain, and snow off of you, but it will still be quite cold.  So be sure to insulate your body from the cold ground, which sucks away body heat quickly. Lay down a bed of the same materials you used for the frame right on the ground to lay atop of. Bundle up under an emergency blanket or anything extra on hand, And of course get a fire started if at all possible. Be sure to build the fire close enough to the shelter so that you get some of the radiant heat, but not so close that your shelter catches fire.

When dawn breaks, you might be a bit worse for wear, but you’ll be alive. You feel a sense of accomplishment that you were able to take care of yourself (and others if they’re with you). And you can reassess your situation anew, and determine the best plan to get back to safety.

Wednesday, 1 March 2017

How to Purify Drinking Water


In our everyday lives, we don’t often give the purity of our drinking water a second thought. We just blindly assume the water from the tap is safe, and we have even more confidence in the bottled water we buy from the store.

But in an emergency situation like a natural disaster, or being out in the woods without access to pure water, the cleanliness of our drinking water takes on a heightened importance. As ingesting water from a source that harbors dangerous pathogens and/or heavy chemicals can bring on rapid sickness that can lead to death, knowing how to purify water is an absolutely essential skill that everyone should have.

Methods for Purifying Water


So if you’re on a hike or lost outdoors, or in an urban environment where flooding/water main break has contaminated the water supply, you shouldn’t trust any water source that wasn’t already prepackaged. But you’ll only survive a few days at most without water, so you’ll have to drink eventually. In the meantime, here are several ways you can purify your drinking water.

  1. Boiling – This is by far the safest way to ensure the water you’re drinking is free of harmful bacteria. Although water reaches a boil at 212 degrees, it’s been said that you can kill any bacteria at just 158 degrees. To be safe, bring the water source to a boil and let boil roll for at least 2-3 minutes. There may still be sediment or particulates in the water depending on the source, but at least you’ll know it’s free of potentially deadly pathogens. Use a cup, canteen, bottle, or any container you have around for the task. It also helps to have some sort of fire-starting implement on hand to speed up the boiling process.
  2. Purification via pumps and/or filters – You can find all kinds of pumps and filters at sporting goods and camping stores. So if you happen to have a store-bought filter with you, you’re in luck. These work by forcing the non-potable (undrinkable) water through filters of either charcoal or ceramic, and also treating the water with chemicals. Even if you don’t have a ready–made filter, you can use some of the key elements to partially purify your water in a pinch. Filtering water through regular charcoal, for example, is excellent for removing particulates. A regular coffee filter works well also. But you’ll still need to boil the water to ensure no bacteria is present.
  3. Purification drops/tablets – This method uses chemicals such as iodine 2% and potassium permanganate added to the water in drops or tablets to purify it. After treating the water this way, be sure to give the chemical at least 20 minutes to work. Yes, the water will taste bad, but it will be safe to drink.
  4. Evaporation – What you’re trying to do here is get the water source to evaporate, which leaves the bad stuff behind, and then capture the evaporated drops somehow. One way to do it is to wrap plastic around a branch or living greenery and then collect and drink the condensation. Or you could create a still and capture a few evaporated drops, but either way, the amount is really insignificant. So employ this method only in the direst emergencies.
  5. UV Light – Did you know that UV light can kill bacteria? If you have a clear, plastic bottle on hand, fill it up with water and set it out in the sun for about five hours, double that time if it’s cloudy or overcast that day. It’s not the most optimal method, but it’ll work when you can’t boil the water.

Lastly, whatever you do, don’t drink your own urine or any salt-water like that found in an ocean or lake. The salt will bring on dehydration much faster than if you weren’t drinking anything at all, and it will kill you in short order. And if you absolutely must drink untreated water, try to locate a clear, running stream to sip from until an alternative source can be found.

Friday, 24 February 2017

What Do You Think Of The History Channel's Show "Alone?"


I'm curious, what do you all think of The History Channel's  show "Alone?" All the contestants appear to be Youtube guys, which makes sense since they have more experience with video, etc. I have great respect for them putting themselves out there like that. But many seemed to not have much experience spending time alone in the woods considering they are billing themselves as survival experts. After just a day or two, some were crying on camera. One couldn't make fire with fatwood, which is waterproof and burns in the rain. Many could not get a fire going after several days, unaware of how to dry tinder inside a jacket.

Still, I think it is an entertaining show and shows the harsh reality of life in a survival situation. I do think it's overzealous that History branded all of them as "survival experts" just because they have Youtube channels. Some of these guys obviously have good skills and are entertaining to watch, but some have padded their resumes a bit, or else History did it for them. Had they not been represented as survival experts, I would say most of them have done a great job so far. 

Maybe History Channel should just remove the "expert" moniker and then the show would better represent itself. I think many people have grown weary of survival shows misrepresenting themselves in this manner. What do you think?

Leave a comment below or join the discussion on Facebook

Thursday, 9 February 2017

Can Bushcraft Save The Planet?

I think there is one particular outdoor activity which might be more effective at helping people learn to care for the environment than any other. Could bushcraft be that activity?   


Environmental Education (EE) as it exists now is a relatively new field, developed as a result of growing concern that the environment was suffering from pollution, deforestation, desertification etc. as a result of human activity. Although the  Schools Councils 1974 Project Environment discussed the difference between education  ABOUT, FROM and FOR the environment, EE was not addressed on a global scale until the Tbilisi conference in 1977. Organised by UNESCO the conference brought together delegates from  66 nations and representatives from UN agencies and NGOs to participate in the world's first intergovernmental conference on environmental education. 

As a result of this conference, a declaration was adopted, after a unanimous agreement that EE had an important role in the preservation and improvement of the global environment. This declaration included the following goals; 


  • to foster clear awareness of, and concern about, economic, social, political, and ecological interdependence in urban and rural areas;
  • to provide every person with opportunities to acquire the knowledge, values, attitudes, commitment, and skills needed to protect and improve the environment;
  • to create new patterns of behaviour of individuals, groups, and society as a whole towards the environment.


Traditionally Outdoor Education has included EE among its aims and objectives, although it could be argued that actually most outdoor education does not directly meet the goals of EE instead focusing on the acquisition of technical skills, team building or confidence. But I think there is one particular outdoor activity which might be more effective at delivering the goals of EE than any other. 


 BUSHCRAFT AS A TOOL IN ENVIRONMENTAL EDUCATION


Bushcraft is one of those activities which takes place out of doors which I think has the most potential to allow for the delivery or inclusion of EE. In my opinion, the most important aspect of bushcraft is gaining the knowledge that allows you to practice whether as a hobby or a professional instructor. This knowledge is far more important than the kit you own - whether your knife is a £300 and custom made or a cheaper £15 model. 

Practising bushcraft pulls you right into the environment, it can't be carried out in an artificial setting, it can't be separated from the environment and in fact, you could say it is symbiotic with it. Think of the skills that you use to sustainably harvest resources from the woods, coppicing for example. Coppicing has been carried out in the British Isles for hundreds, if not thousands of years and maintains many broadleaved woodlands which exist in the state we see them in today. 

If you are coppicing for shelter poles, material for

construction projects, walking sticks, stocks of firewood to be dried for later in the year or material for carving and whittling you are using your knowledge of when to cut to encourage regrowth, how to cut to prevent or reduce the chance of disease, which species are suitable for coppicing and for your desired use. Also, whether or not you realise it or not, you are actually creating a niche habitat in a woodland.  You are demonstrating a greater understanding of your local environment than most people (as long as you are carrying out your bushcrafting responsibly and sensitively in places where you have permission). But I also feel strongly that although involvement with the natural environment, outdoors, can promote an appreciation of the environment, this is by no means automatic nor, if it does occur, does it always extend to the environment as a whole but possibly only to a very limited area where a person feels they have responsibility or a vested interest. So as a bushcrafter do you only have a vested interest in that small piece of the 'environment' where you have permission to practice? 

I would argue that as bushcraft is such a broad topic which draws on the knowledge and skills of first nations and traditional skills from all over the globe, bushcrafters are in an excellent position to broaden our own minds and the minds of those we teach as to issues beyond our normal stomping grounds. In fact, the following quote sums up a lot of my reasoning as to why bushcraft could be so valuable in EE;

“Within the context of their own lifestyles indigenous peoples have been practising ‘environmental education’ for thousands of years.” (S. Sterling, Sustainable Education,  2001).

So much of what we practice is based on these skills because quite simply indigenous people relied ENTIRELY on their environment for their subsistence and over-hunting, over-fishing, pollution of water sources, the decimation of woodlands or other habitats due to fire, natural disaster or exploitation could literally cost them their lives. However they chose to teach the next generation to respect their environment, it was effective. The Tukano Indians of South America believed in a 'Master of Animals' who would punish them for over hunting. The Australian Aboriginal cultures tell stories of 'Dreamtime' or the creation which teaches lessons about how to live. Every other culture has its unique traditions and beliefs which govern how they live and how they interact with their environments. As bushcrafters, we have a responsibility, and a better opportunity than many to deliver engaging activities outdoors which bring people into direct contact with the environment on a level which means they have to think about how to care for that environment. 

We need to rekindle that indigenous knowledge and pass it on as there aren’t many people now who seek as close a relationship with the natural environment as we enjoy.      


Monday, 6 February 2017

3 Handy Tips for Ferrocerium Rods


Ferrocerium rods are a favourite fire starter among many outdoor and survival enthusiasts. Ferrocerium is a man-made metallic material that produces sparks in excess of 3,000 degrees Fahrenheit when it’s scraped with a rough surface or a sharp edge. The ferrocerium recipe varies by manufacturer, but it’s generally 50 percent cerium, 25 percent lanthanum, and 19 percent iron, with small amounts of praseodymium, neodymium, and magnesium. The most common use of this material is as the flint in cigarette lighters. And while a butane lighter may work best in most fire-starting situations, a “Ferro rod” makes a great back-up. Here are three things to keep in mind when using a Ferro rod to start a fire.

Pick The Best Tinder: It might seem odd to use natural plant fuzz as tinder, but it is truly one of your best choices for getting a flame started, and works as well as cotton balls or dryer lint. These fibrous and fluffy materials of botanical origin are the perfect fuel to allow the sparks to “stick” and begin burning. Cattail seed down, goldenrod fluff, and milkweed down are among my favourites to use. Just collect a little bit when it’s dry, and store it in a water-tight container for use in fire starting.

Move The Rod, Not The Scraper: Rather than pushing the scraper against the rod toward your tinder, pull the rod across the scraper toward yourself. You’ll still provide a hot shower of sparks, but avoid knocking your tinder all over the place with your follow-through.

In The Deep Cold: Can’t get your butane lighter to work at 10F? That’s because butane will begin to gel once temperatures get into the teens. If the butane gels, you may be able to warm it up by placing it inside your clothing for a while. Or you could just move to your ferrocerium rod, which is unaffected by temperature extremes, and even works when wet.

How do you use your Ferro rods? Let me know your method by leaving a comment.


Wednesday, 1 February 2017

How to Make Your Own Primitive Fish Hooks


Gorge hooks may well be the oldest style of fish hooks on earth. They can be made from a wide range of materials and they can be surprisingly effective, though they are not suitable for catch-and-release. But that's okay: We're going to talk about them as a survival tool, so throwing back fish would be counter-productive.

The function of these hooks is pretty straightforward. Your goal is to entice the fish to swallow a pointed object that will lodge in the soft tissues of its stomach or oesophagus, allowing you to land the fish. Bait is usually involved, but the technique is different from those employed in modern fishing. When a fish nibbles at the gorge hook, give outline and wait. This is very contrary to the quick tug most of us are used to when setting our standard fish hooks. With the gorge you give out 10 to 15 feet of line, wait 30 seconds, and then gently retrieve the line (and hopefully the fish). Use a net (or a basket tied to a stick) to lift the fish from the water. It might throw the hook if you try to lift it without the aid of a net. Tear the gorge free, re-bait if necessary, and cast it out again.

Here are three different styles of gorge hooks, all of which can be fished in the same manner.

Single-Point Hook


The simplest style. Hawthorn, honey locust, hardy orange, and many other trees and shrubs have thorns that are sharp and ready to go without modification. Broken bone shards and wood splinters with a single point can be used, too. Tie your fishing line to the blunt end of the gorge, and insert the hook into a chunk of meat or a fat grub. Position the gorge so that it makes a "V" shape with the fishing line. This positioning enables it to act like a hook. Inch-long thorns are usually the right size for trout and panfish.

Double-Point Hook


This style of gorge is often made from bone shards that are sharp on both ends. Tie the fishing line in the centre of the gorge, like a toggle. Insert the gorge into the bait so that it is parallel to the fishing line. The "V" shape will either hook into the fish's innards, or the hook will turn perpendicular to the fishing line and hang up that way. A two-inch gorge like this can land fish up to five pounds.

Composite Hook


The composite hook is the closest match to a modern fishing hook. It comprises a sturdy yet thin shank of wood or bone and a thorn or bone shard to create the "V" shape and provide the point. Since damp wood, thorns, and bone aren't sharp enough to pierce through jaws and scales, the composite hook needs to be swallowed like the other gorge hooks. A one-inch barb on a two -inch shank can catch fish up to 10 pounds.

Friday, 20 January 2017

Fire Pits, Mounds, and Platforms


Fire is one of our best friends in a wilderness emergency, and we need to plan accordingly for it. When it’s time to set up a fireplace, you’ll need to figure out exactly where and how to build it. Some conditions require a mound underneath your fire, while other circumstances demand a fire pit. And in a few situations, the fire has to be on a platform in order to burn at all. Here are some of the conditions in which to use each.

Fire Pits


These are the most common places to build and maintain a fire. Most fire pits are circular, dish-shaped depressions or holes. They can be almost any size or depth, depending on the size of the fire you need. These depressions cradle the fire, grouping the coals in the center to help them burn longer and hotter. You don’t want to make the hole so deep that it keeps in all the heat, unless you’ve had to build a fire under very windy conditions. For this case, you’ll want to create a Dakota fire hole. This is a Native American fireplace style which burns wood efficiently like a wood stove; and it provides a greater margin of fire safety by keeping coals and flames fairly contained in windy conditions. This setup involves two holes in the ground with a tunnel connecting them at the bottom. The “upwind” hole stays empty and acts as a funnel to catch the wind. The fire burns in the “downwind” hole, relatively safely.

Fire Mounds


In wetter climates, or in areas prone to sudden downpours of rain, the fire mound makes a lot of sense. Fire pits can easily fill with water and drown your coal bed. When this happens, your fire is doomed. The ancient forebears to the Seminole natives started using simple mounds of sand to keep their fires going in the wet and swampy terrain of the American southeast. This technique is still in use there today. Fire mounds can be made from almost any non-flammable material: Sand, soil, mud and stone can all be used to give you a mound for a high and dry fireplace. Build the mound as tall as you need, from a few inches to a foot tall.

Fire Platform


Burning a fire on top of the snow is often one of those things that you never really think about until you have to do it. In areas with little snow, you can always dig down to the soil surface to build your fire. But if the snow is very deep, or you lack digging tools, fire on top of the snow is the best option. Less experienced outdoor enthusiasts often get a rude shock the first time they try burning a fire directly on the snow. The fire starts out normally enough. Then the snow melts, which puts out your coals and leaves you with no fire and a jumble of wet, black sticks. To solve this problem, you’re going to need a platform. This can be a manmade material such as a piece of metal for a platform. You’ll just need some logs or rocks under it, so the metal doesn’t melt the snow underneath. If you don’t have metal, the platform can be made of dead wood, rotten wood or green wood. This last choice is the best, because the live wood has enough moisture in it to keep it from burning for a few hours, but not so much moisture that it puts out your burning sticks or bed of coals. You can use whole chunks of wood or split the wood in half to create a very flat platform. Obviously, the whole pieces will last longer than split wood. Replace the raft as needed.

Monday, 9 January 2017

The Paradisiacal Pine Resin


Pine resin or pitch is the secretion from pine trees caused by cuts in the tree trunk or from broken limbs. The trees secrete the resin to seal up any cuts or damage to the tree. If you find yourself lost or stranded in a wilderness environment one of the best-case scenarios is that there are pine trees in the area. Pine resin exposed to the air will harden/crystallise but it can be softened for use by heating.


Medical Uses for Pine Resin


Treating wounds


A traditional use for pine resin has been as an external treatment for burns and sores. A long-term study was done by Russian scientists and published in the April 2002 issue of the “Byulleten’ Eksperimental’noi Biologii I Meditsiny” found that pine resin, as a main active ingredient in Biopin ointment, inhibited antibodies found in bodily fluids but aided healing and prevented infection by boosting cell immunity. The ointment did not cause irritation or allergic reactions.

Rheumatism

Native Americans have used pine resin to treat rheumatism because of its anti-inflammatory properties. The resin acts to remove the joint inflammation caused by rheumatism, which helps to restore movement and to alleviate pain. The Costanoan Indians gained these benefits by chewing on the gum-like resin.

Other Uses for Pine Resin


During the American Civil War, the Confederate surgeon Francis Porter used pine resin as a stimulant, diuretic, and laxative. In China,  the resin from a particular pine tree is used to treat abscesses. Resin from the spruce tree was used by colonial Americans as a cold and cough remedy, as well as straight from the tree as a cancer treatment. Physicians in colonial America also recommended tar water, or ground pine resin mixed with water, as a remedy for ulcers, smallpox, and syphilis. These are traditional holistic medicinal uses for pine resin that have not, as of yet, been confirmed by modern science as effective, but that does not mean there is no basis for some of the claims made about resin’s anti-inflammatory properties.

This may be so but the fact is that the resin once applied to a cut or scrape will inhibit the growth of bacteria because it denies the bacteria the moisture it needs to survive. Because of its very sticky nature, pine resin can be applied directly to a bleeding cut to help stem the flow of blood and close the wound up similar to stitching. Some survival experts use pine pitch in place of super glue to seal up cuts. Leave the resin in place, and reapply as needed. There have been reported cases where serious bleeding wounds have been stemmed using pine resin.

Waterproofing Shoes and Other Materials

Pine resin is essentially impervious to water so it can be used to treat objects to make them resistant to the damages caused by moisture. It can be used to seal seams, repair breaks/holes in boats, shoes and structures to prevent water leaks. In a survival situation, you may have to repair holes in boots, shoes and shelters. You can also use the resin to waterproof the lower half of your hiking shoes or boots.

The resin must be heated to liquid form so it can be applied to the material. Avoid heating the resin in a shallow container over an open flame because the flames from the fire can easily ignite the resin, which is highly flammable. Let the fire burn down to coals before heating the pitch. Find a short green stick and repeatedly strike one end to create bristles in the wood, (paintbrush) or chew on the end to break the fibres apart so they can be used to apply the pitch. Use the resin to repair holes in canvas and heavy nylon. Lay the material flat where the rip or seam is exposed. Once the resin is heated to liquid form, apply using the fibrous end of the stick.

Pine Pitch Glue

Warm the resin to liquid form and while the resin is heating, crumble some charcoal from the fire as fine as possible. Once the resin is ready, remove it from the heat and stir in the powdered charcoal. The amount of charcoal added should be about one-third as compared to the volume of the pitch. Find a solid stick with a blunt end and dip repeatedly in the mixture to form a ball of pitch on the end. You may need two sticks. This is how the glue is stored until needed. The glue will harden and to use heat until pliable.

Use the glue to form fishhooks, repair the soles of shoes and use to repair holes in water containers. Use the glue to apply feathers to homemade arrows or allow hardening on the ends of fishing/hunting spears to prevent splintering. Glue in a survival situation has unlimited uses.

Fire Starting

Pine resin is flammable and can be used to help start a fire in damp conditions. You may find yourself in a situation where all of the available wood is damp but this does not mean you have to go without a fire.

Find some hardened pine resin and some pine sticks/branches. Split the sticks and look for streaks of resin in the wood. Use magnesium shavings and a flint bar or you can use a Ferro rod to ignite the pitch. Lay some dried pine needles near the pitch and ignite the pitch. It will burn like a candle long enough to dry the needles out and you can begin adding small pieces of the pine which even if somewhat damp in the middle will burn because of the resin. Once you have, a sizable flame established you could then begin drying out other wood.

Illumination and Heat

You can use pine resin to create a lamp. Find a stone with a depression or use a clamshell or any type of shell that can be filled with resin or use a cupped shaped piece of bark. You will also need material for a wick. Use some twisted cloth or even dried moss. Fill the depression with the pitch and lay the wick material on top. You ignite the wick first, which will, in turn, ignite the resin. The resin will burn like a candle and you can feed it more resin to maintain the flame once ignited.

To use as a heat source place a metal container that has plenty of air holes in it over the ignited pitch. The metal container will absorb the heat and conduct to the surrounding area. This method will not heat a large area but will warm hands and feet in an emergency.

Considerations

In most cases, you will find damaged pine trees/broken limbs that have secreted resin. It is recommended that you first look for damaged and fallen limbs before you purposely cut into a pine tree to harvest the resin. If you have to damage the tree do it in a small area on one side of the tree only. Only take as much as you need, you must allow some resin to remain on the tree so it can protect the cut to prevent boring insects from destroying the tree.

References and Resources


Tuesday, 3 January 2017

Plant Lore: Cattail

The most common cattail (Typha latifolia) that we all recognise is a tall plant often found growing in dense stands in wetland areas, such as marshes and bogs. Various other species of cattail are found worldwide.


General Characteristics:


The very recognisable and familiar cattail flowers begin as green spikes (female parts) with loose, dangling hairs containing pollen (male parts) above that. Once fertilised, the female parts turn dark brown and the male parts fall away, leaving a stiff, pointed spike. The leaves are very tall and narrow (grass-like). A tall marsh plant, that grows in dense groups. Early in the year, the top of the head has a slender tail of lighter coloured staminate flowers, the lower dark brown area being tightly packed pistillate flowers. In fact, the flowers are very prolific, one stalk will produce an estimated 220,000 seeds. Even with this number of seeds, cattails colonise by sending up clones from the creeping rhizomes. It has been recorded that a cattail marsh can travel up to 17 feet in a year with prime conditions through the cloning process. Colonisation can happen quickly, as one new seed produces a plant, that new shoot in its first year will send out rhizomes for ten feet in all directions and can produce 100 clones in that first growing season. Cattails can reach heights 3-9 feet.

There are some poisonous look-alikes that may be mistaken for cattail, but none of these look-alikes possesses the brown seed head.

Blue Flag (Iris versicolor) and Yellow Flag (Iris pseudoacorus) and other members of the iris family all possess the cattail-like leaves, but none possesses the brown seed head. All members of the Iris family are poisonous. Another look-alike which is not poisonous, but whose leaves look more like cattail than iris is the Sweet Flag (Acorus calumus). Sweet Flag has a very pleasant spicy, sweet aroma when the leaves are bruised. It also does not possess the brown seed head. Neither the irises nor cattail has the sweet, spicy aroma. I have seen large stands of cattails and sweet flag growing side by side. As with all wild edibles, positive identification is essential. If you are not sure, do not eat it.

The list of uses for this plant is quite extensive and it has been said that if a lost person has found cattails, they have four of the five things they need to survive: Water, food, shelter and a source of fuel for heat—the dry old stalks. The one item missing is companionship. Some of the plant's major uses are:


Food source


The stems a few inches above the soil line in early summer are young and tender and can be peeled and eaten raw or boiled. The roots are great as well, simply pull the lower stalks until the roots break free, peel and eat raw or boil. The cattail will also develop flower heads that can be eaten by roasting as if you would an ear of corn. By mid to late summer, pollen will collect on the heads and it is easily shaken loose into any container to be used like flour to make bread, pancakes and can be used for thickeners in gravies and sauces. The roots in late fall and early winter can be mashed and soaked in water to release the starch. The starch will settle on the bottom and will resemble wet flour. Drain the water off and make bread, by adding a little pollen or add to clean water to make soup. Cattails are an ideal survival food because they are easily recognisable and grow practically anywhere there is water.

Shelter Material


The green leaves can be cut and woven together into shingle like squares for covering a shelter roof. The material will provide protection from the rain, snow and the wind even after it has dried. Weave a sleeping mat by making two long mats. Connect the mats on one side so it can be folded like a sleeping bag. Before folding over fill one side with pine boughs or other material suitable for sleeping on and then fold the empty half over and tie off so the “stuffing” is secured inside. You can fold the mat up and carry it with you if you have to break camp for another location.

Medicinal Uses


Cattails are truly a survival plant in the truest sense of the word. They not only provide, food, material for shelters and cordage cattails have medicinal uses as well. To treat burns, scrapes, insect bites and bruises split open a cattail root and “bruise” the exposed portion so it can be used as a poultice that can be secured over the injured area.

The ash of burnt cattails is said to have antiseptic properties and many people have used the ashes to treat wounds and abrasions. If you look closely at the lower stems you will notice an amber or honey like substance that seeps from the stem, use this secretion to treat small wounds and even toothaches, because it also has antiseptic properties.

Baskets or Packs


You can get creative and weave baskets or small packs for carrying food or other items. Cross a number of leaves together and once you have the base the size you want you would fold the pieces up and then weave around the sides to secure the shape. You can easily weave handles or straps into the basket/pack. The basket will become stronger as the cattail leaves dry and harden.

Cordage


Peel strips from the leaves and allow them to dry somewhat. Once dried braid at least three strips together to create a line for fishing or use in shelter building.

As you can see there are many edible and useful parts of the cattail, but now we are going to take a look at the uses for the fluff from the seed head:


Tinder


Once shredded from the seed head, the cattail fluff expands into a soft, string-like material – perfect for trapping sparks to create a campfire. Ensure you mix some other material with it as well. However, cattail fluff can burn very quickly, sometimes too quickly!

Charcloth


For starting a fire with old-fashioned flint and steel sets, or when using a magnifying glass to intensify the sun’s rays to start a fire, Charcloth is an ideal product to use.

The steps to create this handy material are quite simple; just pack a metal box with cattail fluff, pierce the box with a nail to make a small hole, then place the box into a campfire for 5 minutes. Use a stick or rod to remove the box from the campfire after some time, then let it cool. Now you have a premium Charcloth!

Lamp wicks


The first people to roam America were the Paleoindians, and they had many resourceful ways to survive in the harshest conditions of the New World.

A simple oil lamp was one way that they lit their caves and rock shelters. A pinch of cattail fluff rising up out of oil made for a fine wick. Try it yourself! If for any reason you don’t have any ‘mammoth’ fat, try a block of lard with a cattail wick.

Insulation


You can use cattail fluff inside any item for warmth, such as your hat, some of your clothes, or your footwear. It’s like a plant-based variety of insulation.

Insect Repellent


In certain situations, the smoke from the seed head of a smouldering cattail can be a substitute for insect repellent. On a fire safe surface, put the smoking cattail head upwind from your location and the bug repelling smoke will waft over you for 20-30 minutes. You can even leave the seed head attached to the stalk and stick it in the ground as a stand.

Have you tried using cattail for any projects? If so, please tell me what you did by leaving a comment


Thursday, 29 December 2016

Winter Camping, Is It Worth It?

Your summer calendar may be filled with camping trips, but this is not enough reason to completely close your doors to camping during the chillier months of the year. Believe it or not, winter camping has its own set of perks.


Photo Credit: Bushcraft and Survival Belgium


The Advantages of Winter Camping

If the brisk air and the frosty winter mornings are keeping you from venturing into camping, then you might want to take a look at some of the undeniable advantages of winter camping:


  • Less Crowded Camping Sites: Camping off-season is not everybody’s guilty pleasure. With fewer campers on your trails, you can comfortably pick the most ideal camping spot. However, make sure that you are setting up your tent in areas where landslides and avalanches are least likely.

  • Picturesque Winter Views: Camping during the winter season lets you see the world in a different perspective. Basically, you can expect scenic views as the snow slowly covers leaves and trails. The mountains may look a bit frostier, but you’ll never see picturesque winter views during the early months of the year.

  • Bid Goodbye to Mosquito Bites: Just like many campers, ticks, mosquitoes and other bugs go dormant during the winter season.

  • Rewarding Camping Experience: If winter camping has never been a part of your bucket list, you should try it at least once. Offering you a closer encounter with nature, winter hiking is a challenging, yet fulfilling experience.


Despite its plusses, winter camping is not for everybody. If you think you have the experience, knowledge and skills to go camping during the last few months of the year, go ahead and dive into a new adventure.

Just remember, there is no substitute for mental and physical preparation. Before scheduling a camping trip, research on some winter camping dos and don'ts so you would know what to do in case the going gets tough.

Saturday, 17 December 2016

Tree Lore: Holly

Botanical painting of Holly

LEARN 9 BUSHCRAFT USES OF HOLLY


According to the medieval Brehon laws of Ireland, if someone was caught illegally felling a holly tree the culprit was obliged to owe the landowner the hefty fee of two milking cows.

During that time period trees were categorised into four divisions according to their cultural and practical value. The highest value division was the Airig Fedo division.

Airig Fedo is a Gaelic phrase meaning Nobles of the Woods.

Only 7 native trees were bestowed the lofty status of a noble: oak, hazel, yew, ash, pine, apple and holly (1).

What made holly a valuable tree was its tough, heavy wood which was favoured, during those times, for making spears and chariot axles – both understandably much-valued items during the periods of strife that was widespread during that era.

Holly was also an essential fodder crop. The nutritious, evergreen leaves of holly were the perfect fodder crop for livestock during the lean months of winter.

Holly leaves were an important winter fodder in parts of Ireland as recently as the 1950’s, until replaced by hay as the primary winter fodder (2).

Identification
of
Holly, Ilex aquifolium


Alternative names:    Hulver Bush, Holm, Holy tree, Christ’s Thorn, European Holly, Common Holly, English Holly.


Family: Aquifoliaceae

Distribution:   Generally common in Ireland and Britain, often found as an understory tree of native, deciduous woodlands or part of a hedgerow system. Found throughout most of central and south Europe.


KEY IDENTIFICATION FEATURE OF HOLLY…
SPINY, LEATHERY LEAVES!


Glossy, dark green, upper leaf surface. Under the surface of the leaf is light green.


Holly is evergreen. Its characteristic, spiny leaves are present throughout the year


Flowers: Fragrant, white, four-petalled & small (6-10mm). Unusually, the petals have a leathery, waxy texture. The flowers originate from the leaf axils (the junction between the leaf stem (petiole) and the twig it's attached to).


The distinctive, 4-petalled white flower of holly


Buds: Small (2-3mm long), green, hairless and pointed.

Bark: In its youth, holly bark is smooth and usually of a light grey colour. With age, the bark becomes progressively rougher. There can also be a number of small protuberances protruding from mature bark.

The bark of mature holly is noticeably rougher in texture and appearance and can have a number of small bumps on the bark

Profile: Holly is generally a small tree, and slow growing. The overall shape is often domed or conical. Often, holly trees will refuse to take on a neat shape and have a somewhat scraggly, dishevelled appearance.


The overall appearance of holly trees can be a little on the unruly side

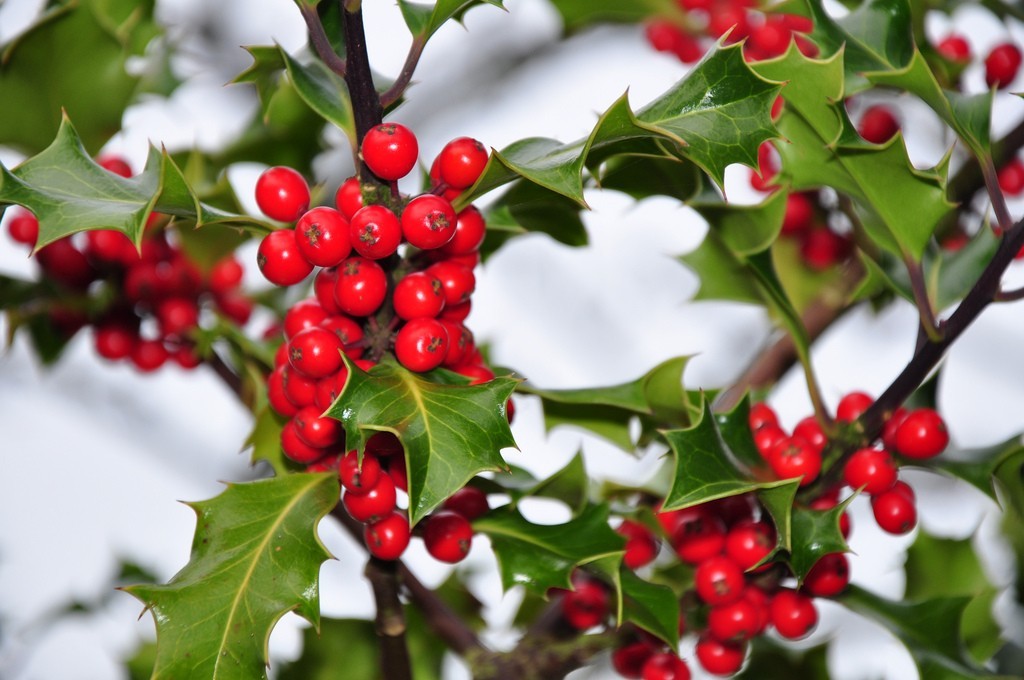
Berries: Female holly trees produce clusters of striking, coral-red berries.

Poisonous to humans but edible for a lot of wildlife.

Important food item for winter-visiting, migratory thrush species such as the fieldfare, Trudus pilaris, and redwing, Turdus iliacus. Often, mixed flocks of both species can be seen descending on berry-laden hollies during winter – gobbling away to their heart's content.

The hard berries of holly soften after exposure to frost and provide much needed, cold-weather sustenance for not only for bird species but also some mammal species, such as the red squirrel and pine marten (very partial to berries, despite its fearsome reputation).


The striking red berries of holly – an important winter survival food for quite a few mammal and bird species

9 BUSHCRAFT USES OF HOLLY

The holly is a great bushcraft tree. Below is a list of 9 bushcraft uses of the holly tree.


1.   KINDLING
2.   FUEL
3.   CARVING WOOD
4.   FEATHER STICKS
5.   FLAMMABLE BARK
6.   BOW-DRILL LUBRICANT
7.   LONG, STRAIGHT BRANCHES
8.   NATURAL SHELTER
9.   LEAF LAYER OF DEBRIS HUT


1. KINDLING
The branches of living holly tree possess an unusually high number of attached, dead, thin, long and flammable twigs.

They are often of ideal length, dryness and thinness for the small twig fire, and just as importantly – it’s possible to collect many dead, holly twigs in a short period of time – important if you need to get a fire going quickly.

Holly trees have an abundance of thin, long, dry dead twigs attached to living branches – they are exceptionally good kindling 


2. FUEL
The dead wood of holly burns hot and long as a fuel.

A lot of dead wood from holly trees has, for some reason, many small holes running throughout the wood which greatly increases its combustibility (more oxygen). The holes could be the remnant burrows of wood-boring insect larvae.

Many holly trees have large dead limbs still attached to the living tree. These sizable limbs are often vertical, or near vertical, and easy to dislodge (all they often require is a sharp shove to dislodge). The more vertically aligned deadwood is, the drier it usually is (sheds rain better).

Large, dead holly branches can be easily broken into shorter lengths by bashing the dead branches over something hard e.g. a large rock/boulder. No sawing or axe sectioning is generally required. However, be careful when forcefully breaking large branches as they can jar the hands when struck or break upwards – hitting an individual in the face.


3. CARVING WOOD
Dense, smooth and often of clean, ivory-white colour – the wood is exceptionally attractive.

Although the wood can be hard to carve, it holds a hard-wearing edge and is an ideal choice for robust carving projects, be warned – the wood can be prone to splitting at the ends when dried too quickly.

It’s important that holly wood has been dried (seasoned) gradually, especially if you are planning on using the wood for important carving projects, such as a knife handle.


4. FEATHER STICKS
Admittedly, holly is not a first choice wood for feather sticks.

It’s hard to acquire sufficient lengths of holly wood that is knot-free. Also, dead holly tends not to yield long, multiple-curled shavings when carved.

However, it’s possible to make small feather sticks from holly – it’s just that more of them are required to make a large enough mass of curls for a sure-thing fire in damp conditions – anything between 4-8 feather sticks, even more.

How many feather sticks is exactly needed depends on your feather-stick making skills and the quality of the holly wood that you are using (make sure to make plenty of thin splints as well!).

So, why bother making inferior feather sticks from Holly? There are deciduous woodlands that have a vigorous understory of holly with few other tree species present. In those instances, holly can be the best feather stick choice and since bushcraft is very much about expanding our skill sets for all eventualities…

5. FLAMMABLE BARK
Birch is not the only deciduous tree in town that has flammable bark.

Mature holly trees, especially standing, dead holly trees, sometimes shed a peeling bark that is flammable – certainly not as flammable as birch bark, nor does holly bark come off in the same copious quantities as birch bark – but off it comes, and it's flammable – and can give you a fire-lighting edge when you need it.


6. BOW DRILL LUBRICANT
The leaves of holly, when crushed, are fantastically waxy.

Holly leaves make a first-class lubricant for the handheld (bearing block) of the bow drill.

Personally, I admire the way my drill spins in the handhold when lubricated with holly leaves. Makes drilling a lot easier which enables me to spin my drill as fast as possible with less effort.

Seriously, I’ve found holly leaves to be a great bow drill lubricant and so will you?

Occasionally, I will put a few holly leaves in my backpack when the opportunity presents itself – just in case I decide to make a bow-drill fire in a location where holly trees are absent.


7. STRAIGHT, STRONG BRANCHES
Not a whole lot of deciduous tree species naturally produce straight branches.

Of course, some tree species when coppiced, such as hazel and sweet chestnut, produce an abundance of straight branches. Un-coppiced holly is generous in its gift of straight branches.

Strong, long and tough – the straight branches that grow as secondary growth on the larger branches or a basal growth at the bottom of the main tree trunk have multiple, potential uses – shelter construction, throwing sticks, batons, digging sticks, arrows, walking staffs, spring traps and pot suspension are just a few applications for the straight, tough and long branches of holly.

It’s not hard to see why, historically, holly branches were once used for making spears and chariot axles.

Straight and strong branches growing from the base of a holly tree. Holly branches are also quite elastic 

8. SHELTER
An unusual application of holly. The dense, evergreen canopy of holly can provide a discreet, well-sheltered site.

Many holly trees have a canopy that reaches close to or to, the ground. Such trees are great for wildlife observation, or as a sheltered spot for sitting out inclement weather (while getting a quick brew on) or as a discreet camping site.

Just be mindful of the spiny leaf litter of hollies – some form of barrier is required to comfortably sit or lie under a holly tree. Alternatively – clear away the holly leaf litter from under the tree.

Bonus: the thick evergreen canopy of holly tends to disperse campfire smoke very well – important if you want to maintain a low-impact presence in an area.


9. LEAF LAYER OF DEBRIS HUT
The thick, leathery leaves of holly provide great insulation for natural shelters such as the leaf-debris hut and the leaf-debris group shelter.

Rain tends to be shed off more efficiently from a shelter cocooned in holly leaves. Gathering the spiny, holly leaves can be challenging – usually, some form of hand protection is required.

However, where there are holly leaves there are obviously – holly trees, so making a nice, natural shelter under a benevolent holly canopy can provide additional weather-buffing.


The dense canopy of holly trees can provide a surprising amount of shelter

THINK FOR YOURSELF


WHY YOU SHOULD CONDUCT YOUR OWN BUSHCRAFT EXPERIMENTS


The above list of 9 bushcraft uses of holly is certainly not a comprehensive list of all bushcraft uses associated with holly.

It’s my hope that you create your own list of bushcraft uses for the holly tree – through your own bushcraft experiments.

Of course, it’s important to avail of training courses, advice, research and experience as regards progressing your bushcraft knowledge, skills and experience.

It’s also vitally important that you draw your own conclusions from your own observations, deductive reasoning and experiments.

A key asset of any serious bushcrafter that actually spends a lot of time outdoors is fostering your own ingenuity – that you strive to acquire the confidence and get-go attitude to create and improvise for yourself.

Learn to trust your own ideas, and test them (as safely as possible). If they fail, so what? At least you tried and learned something about what works and doesn’t work.

When you succeed you will plant a seed of confidence in yourself to trust your own observations.

This is important.

Books, training courses, other sources of valid bushcraft information etc. will only get you so far.

Wild places are variable at the best of times – they demand a flexible mindset to overcome some of the inevitable challenges that wild places will occasionally throw at you.

This is especially important if you plan on visiting, alone or with a group, wilderness areas. It’s also important in survival scenarios.

Besides, figuring things out for yourself can be surprisingly satisfying – even fun. Whether it's experimenting with unusual bushcraft applications of holly, or modifying a natural shelter design – it's important that you occasionally flex and strengthen your ability to try things differently – on your own terms.

The art of applying competent, safe and novel ideas in a bushcraft setting, is a practice that improves with regular application. I will explore this theme more fully in a future article, so keep tuned . For now, I hope you enjoy becoming (re)acquainted with a fantastic bushcraft tree – holly.


HELP PRESERVE THE HOLLY


Finally, I’m going to briefly step onto my environmental soap box and share a message I think is important.

In many places, there has been a serious decline in female holly trees due to the custom of cutting down berry-laden holly branches for Christmas.

Often there is a disproportionate ratio of male to female holly trees with male trees greatly outnumbering female holly trees because of a local decimation of female holly trees.

If you are considering collecting holly berries, please refrain from doing so. Wild berries serve a much more vital function in nature – certainly more important than human decoration. The true Bushcrafter cares about nature and tries, when possible, to enhance a woodland rather than unnecessarily deplete its natural resources.

As a holly substitute consider the foliage of invasive tree species, such as cherry laurel, Prunus laurocerasus, and rhododendron, Rhododendron ponticum. Although both species lack red berries, the foliage is certainly pretty enough for Christmas wreaths. You will also be helping to control an invasive species.

References:  

(1), (2) & (3):  Trees of Ireland, Native and Naturalized, Nelson, E. Charles and Wendy F. Walsh.


Saturday, 10 September 2016

How to Use a Flint and Steel


As a follow on to my review of the Wilmas Steel Flint Striker, I thought it would be advantageous to write a brief tutorial on how how to use a flint and steel.

Sometimes I feel like I’m speaking a different language when the subject of true “flint and steel” comes up. For many people, ferrocerium rods and magnesium bars have become synonymous with flint (thank you, Jeff Probst). The Swedish Fire Steel makes other people think that ferrocerium can also be called steel. These days, it’s hard to have a nice conversation about fire starting without everyone getting really confused.

I’d love to clear all this up, so let’s talk about the real flint and steel fire kit—the one that was used by our ancestors  long before matches were ever invented.

Flint and steel is an early fire making technique that dates back to the first days of metal experimentation in Europe and Asia. This fire starting method creates a red hot spark by striking a piece of high-carbon steel against a hard, sharp stone edge (like a flake of flint). The steel shaving is ignited by the friction of striking steel and stone together. This steel spark is immediately caught in fire-charred material, then placed in dry tinder and blown into flame. Easy, right? Well, there is the unpleasant learning curve. Or, as I like to think of it, the part where you are scraping off more knuckle than steel. Just remember that practice makes perfect. 


The Equipment 


A Steel Striker

The striker is a piece of high-carbon steel that creates sparks when it is struck by the edge of the stone piece. Steel strikers are often worked by a blacksmith to achieve the right hardness and also to make the steel into a comfortable shape. Efficiently shaped strikers have been hammered into “C” shapes, “D” shapes and “Horse shoe” shapes over the centuries. Strikers are often made from old files, machetes and other tools, though some of these tools and some knives have the right hardness and carbon content to strike sparks without being modified.

Flint

The Flint can be almost any type of stone that is harder than the steel striker. The piece should fit comfortably in your hand and pose no danger of cutting you. The striking edge of the flint should be 90 degrees or less, though an edge less than 45 degrees will work best. Some of the most common stones in use are flint, chert, jasper, granite, and quartz, just to name a few. You can take a look at our stone tool butchering post if you’re wondering how to break the stone into flakes. (link to stone tool butchering post) 

Char Cloth 

The char cloth is some form of blackened, plant-based material for catching and feeding a spark. Cotton and linen are traditional American frontier char cloth materials; however most flammable plant fibres, tinder, some shelf fungi and punky, rotten wood can be turned into “char cloth." To make char cloth, you’ll need a metal container that is nearly air tight, with just a few small holes poked in it by a punch or nail. Fill the can with the material to be charred, and place it in the center of a campfire for five minutes.

Smoke and maybe some flames should begin to jet from the few small holes in the container. After a few minutes, usually three to five, the smoke should almost stop jetting out. At the 5-minute mark, use a stick to carefully roll the hot container out of the fire and let it become cool to the touch. The char cloth should be black and fragile, but not burned to ash. It should catch sparks well. If not, it may have been a poor material to use or it may need further charring. If it is not yet blackened and fragile, it will certainly need further charring.

Can you just grab some chunks of charcoal from a campfire to use as char? No, sorry. Charcoal was created in an oxygen-rich environment and it does not behave the same as true char cloth. Char materials must be created in a low-oxygen environment in order to work properly, or work at all for that matter.

FLINT AND STEEL TECHNIQUES


Strike the stone downward across your steel, holding the stone at a 45-degree angle to scrape off steel sparks. These sparks come from the carbon in the steel, and the sparks can be scraped off by any sharp stone that is harder than the steel.

The sparks can be struck onto char cloth that is already sitting on a bundle of tinder.

If you used cotton cloth for your char, you can also wrap the char cloth around the edge of the flint, strike through the brittle cloth, and then place the burning char cloth into the tinder. 


TROUBLESHOOTING


If you are having trouble striking sparks:

Change the angle of the flint 
Use a sharper edge on the flint 
Strike harder or possibly softer with the striker 
Change your striking motion

If the sparks will not catch on the char cloth:

Strike the sparks closer to the char cloth 
Change the angle at which you are striking sparks 
Change out the char cloth with a different material

Got any helpful flint-and-steel tricks? Let me know in the comments.