Showing posts with label Plants. Show all posts

Friday, 16 June 2017

How to Identify Amanitas


The Amanita Family

The Amanita Family is certainly one of the most interesting for foragers, and definitely one that any novice forager should quickly familiarise themselves with.

The Amanita family contains roughly 24 species in Britain and some are among the most deadly poisonous mushrooms in the world.

Of the 24 at least 6 are listed as deadly among the books I own. Those are The Death Cap, The Destroying Angel, The Gemmed Amanita, The Panther Cap, The Spring Amanita and The Fools Mushroom. Not all of those are pictured here.


Some Amanitas are edible but not mushrooms we consider safe for the novice forager. The most important thing for any novice forager to learn is how to recognise the Amanitas and what edibles they can look like.

Before even considering eating any of the edible members of this family, or picking any mushroom that can look similar to them, it is worth noting that there is no known cure for the combination of toxins found in some Amanitas. 


A slow death is likely if you ingest these mushrooms, accompanied by terrible pain and extreme gastric problems as they destroy your internal organs.

Identifying all the Amanitas can be tricky but there are some key characteristics most share that you should look out for.

How to Identify the Amanitas.

1. All have white gills and white spores. 

2, All normally have a bulbous base, so when identifying mushrooms you don't know; it is important to get to the very base of the stem or stipe to see what's there. This can often be buried under the forest detritus or even the mud itself.

3, Many grow from an egg sack like structure called a volva. The volva can closely resemble other young mushrooms such as puffballs or stinkhorn eggs or even young Agarics (field mushroom types), so this should be taken into consideration when harvesting any of those edible mushrooms.

4, The remains of the volva can often be seen on the top of the cap of the mushroom, particularly the death cap, which often has the white remains of the volva left.

5, Most have a skirt, and the skirts can either be smooth or striated. Look closely at the skirt characteristics when you start to try to identify the individual species within the family. 

The Grisettes; a subspecies of the Amanitas generally do not have skirts.  Be aware that the skirt on a mushroom can sometimes come off due to weathering or by being brushed or blown off.

6. Many have speckles or spots on the top as with the archetypal gnome seat, The Fly Agaric or Amanita muscaria pictured on the right. This is a very interesting mushroom, and though it is used recreationally it falls into the deadly mushroom category as it has been known to cause deaths. 

Each Fly Agaric mushroom has an unknown quantity of the poison muscarine in it which can have fatal effects.

Different members of the family have slightly different types of speckles, some are scales left from when the mushroom broke through its egg, some seem to be flaky and some are much more like a calcite build up on top of the cap. 

All of these different types of 'speckles' can be washed off by the rain, and some of the most deadly members of the family often have no speckles at all.

Mushrooms that can be confused with Amanitas

Puffballs; small white puffballs can resemble Amanita eggs, always cut your puffballs in half and make sure there isn't a little mushroom inside to be sure you don't have an Amanita.

Young Field Mushrooms or other Agarics; If you pick a young Agaric before the cap has opened then you are running the risk of it being an Amanita. Check the colour of the gills, as with the Amanitas they will always be white and with young Agarics, they will always be off-white to pink.

Russulas; The Gemmed Amanita on the right can look like the common yellow Russula if all of the speckles have been washed off the top. Check the shape and texture of the stem. The Russula stem will be straight and white like a stick of chalk and have no skirt. The Amanita stem will be bulbous at the base and probably have a skirt.

Parasols; there are a number of superficial similarities between the Parasol and the Amanita family. Check the cap of your Parasol to make sure it is actually scaly rather than having scales you can brush off.

Edible Amanitas; the most likely mistake to make is when picking other edible members of the Amanita family, so if you are going to try experimenting with edible Amanitas extreme caution is required. Never eat any mushroom from this family unless you are 100% sure of what it is and that it is edible. Never eat any members of this family raw.

Monday, 9 January 2017

The Paradisiacal Pine Resin


Pine resin or pitch is the secretion from pine trees caused by cuts in the tree trunk or from broken limbs. The trees secrete the resin to seal up any cuts or damage to the tree. If you find yourself lost or stranded in a wilderness environment one of the best-case scenarios is that there are pine trees in the area. Pine resin exposed to the air will harden/crystallise but it can be softened for use by heating.


Medical Uses for Pine Resin


Treating wounds


A traditional use for pine resin has been as an external treatment for burns and sores. A long-term study was done by Russian scientists and published in the April 2002 issue of the “Byulleten’ Eksperimental’noi Biologii I Meditsiny” found that pine resin, as a main active ingredient in Biopin ointment, inhibited antibodies found in bodily fluids but aided healing and prevented infection by boosting cell immunity. The ointment did not cause irritation or allergic reactions.

Rheumatism

Native Americans have used pine resin to treat rheumatism because of its anti-inflammatory properties. The resin acts to remove the joint inflammation caused by rheumatism, which helps to restore movement and to alleviate pain. The Costanoan Indians gained these benefits by chewing on the gum-like resin.

Other Uses for Pine Resin


During the American Civil War, the Confederate surgeon Francis Porter used pine resin as a stimulant, diuretic, and laxative. In China,  the resin from a particular pine tree is used to treat abscesses. Resin from the spruce tree was used by colonial Americans as a cold and cough remedy, as well as straight from the tree as a cancer treatment. Physicians in colonial America also recommended tar water, or ground pine resin mixed with water, as a remedy for ulcers, smallpox, and syphilis. These are traditional holistic medicinal uses for pine resin that have not, as of yet, been confirmed by modern science as effective, but that does not mean there is no basis for some of the claims made about resin’s anti-inflammatory properties.

This may be so but the fact is that the resin once applied to a cut or scrape will inhibit the growth of bacteria because it denies the bacteria the moisture it needs to survive. Because of its very sticky nature, pine resin can be applied directly to a bleeding cut to help stem the flow of blood and close the wound up similar to stitching. Some survival experts use pine pitch in place of super glue to seal up cuts. Leave the resin in place, and reapply as needed. There have been reported cases where serious bleeding wounds have been stemmed using pine resin.

Waterproofing Shoes and Other Materials

Pine resin is essentially impervious to water so it can be used to treat objects to make them resistant to the damages caused by moisture. It can be used to seal seams, repair breaks/holes in boats, shoes and structures to prevent water leaks. In a survival situation, you may have to repair holes in boots, shoes and shelters. You can also use the resin to waterproof the lower half of your hiking shoes or boots.

The resin must be heated to liquid form so it can be applied to the material. Avoid heating the resin in a shallow container over an open flame because the flames from the fire can easily ignite the resin, which is highly flammable. Let the fire burn down to coals before heating the pitch. Find a short green stick and repeatedly strike one end to create bristles in the wood, (paintbrush) or chew on the end to break the fibres apart so they can be used to apply the pitch. Use the resin to repair holes in canvas and heavy nylon. Lay the material flat where the rip or seam is exposed. Once the resin is heated to liquid form, apply using the fibrous end of the stick.

Pine Pitch Glue

Warm the resin to liquid form and while the resin is heating, crumble some charcoal from the fire as fine as possible. Once the resin is ready, remove it from the heat and stir in the powdered charcoal. The amount of charcoal added should be about one-third as compared to the volume of the pitch. Find a solid stick with a blunt end and dip repeatedly in the mixture to form a ball of pitch on the end. You may need two sticks. This is how the glue is stored until needed. The glue will harden and to use heat until pliable.

Use the glue to form fishhooks, repair the soles of shoes and use to repair holes in water containers. Use the glue to apply feathers to homemade arrows or allow hardening on the ends of fishing/hunting spears to prevent splintering. Glue in a survival situation has unlimited uses.

Fire Starting

Pine resin is flammable and can be used to help start a fire in damp conditions. You may find yourself in a situation where all of the available wood is damp but this does not mean you have to go without a fire.

Find some hardened pine resin and some pine sticks/branches. Split the sticks and look for streaks of resin in the wood. Use magnesium shavings and a flint bar or you can use a Ferro rod to ignite the pitch. Lay some dried pine needles near the pitch and ignite the pitch. It will burn like a candle long enough to dry the needles out and you can begin adding small pieces of the pine which even if somewhat damp in the middle will burn because of the resin. Once you have, a sizable flame established you could then begin drying out other wood.

Illumination and Heat

You can use pine resin to create a lamp. Find a stone with a depression or use a clamshell or any type of shell that can be filled with resin or use a cupped shaped piece of bark. You will also need material for a wick. Use some twisted cloth or even dried moss. Fill the depression with the pitch and lay the wick material on top. You ignite the wick first, which will, in turn, ignite the resin. The resin will burn like a candle and you can feed it more resin to maintain the flame once ignited.

To use as a heat source place a metal container that has plenty of air holes in it over the ignited pitch. The metal container will absorb the heat and conduct to the surrounding area. This method will not heat a large area but will warm hands and feet in an emergency.

Considerations

In most cases, you will find damaged pine trees/broken limbs that have secreted resin. It is recommended that you first look for damaged and fallen limbs before you purposely cut into a pine tree to harvest the resin. If you have to damage the tree do it in a small area on one side of the tree only. Only take as much as you need, you must allow some resin to remain on the tree so it can protect the cut to prevent boring insects from destroying the tree.

References and Resources


Saturday, 17 December 2016

Tree Lore: Holly

Botanical painting of Holly

LEARN 9 BUSHCRAFT USES OF HOLLY


According to the medieval Brehon laws of Ireland, if someone was caught illegally felling a holly tree the culprit was obliged to owe the landowner the hefty fee of two milking cows.

During that time period trees were categorised into four divisions according to their cultural and practical value. The highest value division was the Airig Fedo division.

Airig Fedo is a Gaelic phrase meaning Nobles of the Woods.

Only 7 native trees were bestowed the lofty status of a noble: oak, hazel, yew, ash, pine, apple and holly (1).

What made holly a valuable tree was its tough, heavy wood which was favoured, during those times, for making spears and chariot axles – both understandably much-valued items during the periods of strife that was widespread during that era.

Holly was also an essential fodder crop. The nutritious, evergreen leaves of holly were the perfect fodder crop for livestock during the lean months of winter.

Holly leaves were an important winter fodder in parts of Ireland as recently as the 1950’s, until replaced by hay as the primary winter fodder (2).

Identification
of
Holly, Ilex aquifolium


Alternative names:    Hulver Bush, Holm, Holy tree, Christ’s Thorn, European Holly, Common Holly, English Holly.


Family: Aquifoliaceae

Distribution:   Generally common in Ireland and Britain, often found as an understory tree of native, deciduous woodlands or part of a hedgerow system. Found throughout most of central and south Europe.


KEY IDENTIFICATION FEATURE OF HOLLY…
SPINY, LEATHERY LEAVES!


Glossy, dark green, upper leaf surface. Under the surface of the leaf is light green.


Holly is evergreen. Its characteristic, spiny leaves are present throughout the year


Flowers: Fragrant, white, four-petalled & small (6-10mm). Unusually, the petals have a leathery, waxy texture. The flowers originate from the leaf axils (the junction between the leaf stem (petiole) and the twig it's attached to).


The distinctive, 4-petalled white flower of holly


Buds: Small (2-3mm long), green, hairless and pointed.

Bark: In its youth, holly bark is smooth and usually of a light grey colour. With age, the bark becomes progressively rougher. There can also be a number of small protuberances protruding from mature bark.

The bark of mature holly is noticeably rougher in texture and appearance and can have a number of small bumps on the bark

Profile: Holly is generally a small tree, and slow growing. The overall shape is often domed or conical. Often, holly trees will refuse to take on a neat shape and have a somewhat scraggly, dishevelled appearance.


The overall appearance of holly trees can be a little on the unruly side

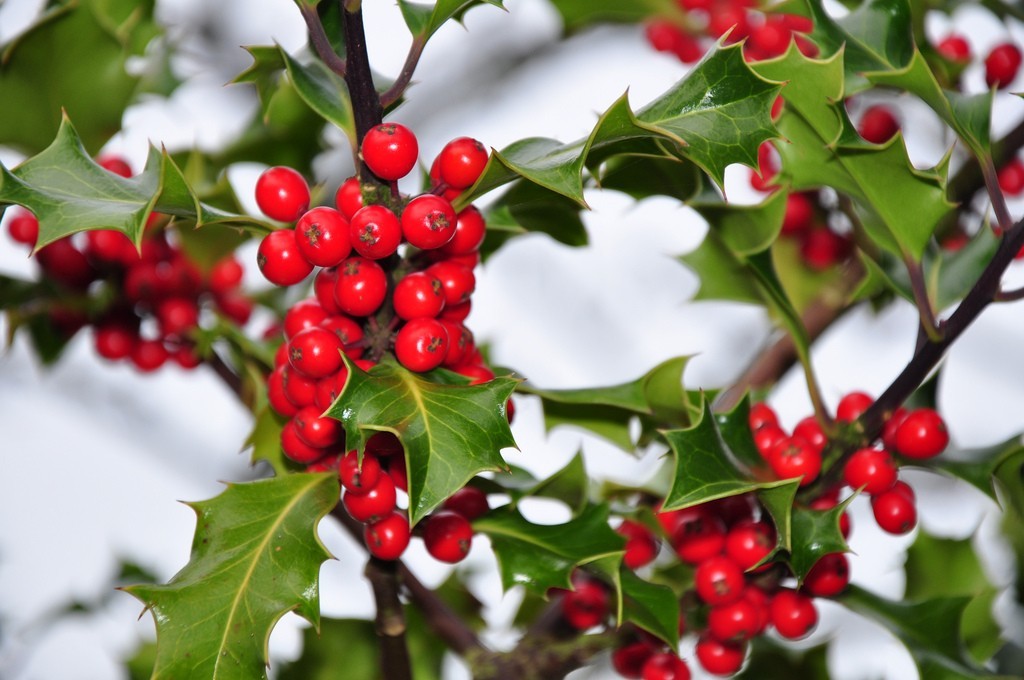
Berries: Female holly trees produce clusters of striking, coral-red berries.

Poisonous to humans but edible for a lot of wildlife.

Important food item for winter-visiting, migratory thrush species such as the fieldfare, Trudus pilaris, and redwing, Turdus iliacus. Often, mixed flocks of both species can be seen descending on berry-laden hollies during winter – gobbling away to their heart's content.

The hard berries of holly soften after exposure to frost and provide much needed, cold-weather sustenance for not only for bird species but also some mammal species, such as the red squirrel and pine marten (very partial to berries, despite its fearsome reputation).


The striking red berries of holly – an important winter survival food for quite a few mammal and bird species

9 BUSHCRAFT USES OF HOLLY

The holly is a great bushcraft tree. Below is a list of 9 bushcraft uses of the holly tree.


1.   KINDLING
2.   FUEL
3.   CARVING WOOD
4.   FEATHER STICKS
5.   FLAMMABLE BARK
6.   BOW-DRILL LUBRICANT
7.   LONG, STRAIGHT BRANCHES
8.   NATURAL SHELTER
9.   LEAF LAYER OF DEBRIS HUT


1. KINDLING
The branches of living holly tree possess an unusually high number of attached, dead, thin, long and flammable twigs.

They are often of ideal length, dryness and thinness for the small twig fire, and just as importantly – it’s possible to collect many dead, holly twigs in a short period of time – important if you need to get a fire going quickly.

Holly trees have an abundance of thin, long, dry dead twigs attached to living branches – they are exceptionally good kindling 


2. FUEL
The dead wood of holly burns hot and long as a fuel.

A lot of dead wood from holly trees has, for some reason, many small holes running throughout the wood which greatly increases its combustibility (more oxygen). The holes could be the remnant burrows of wood-boring insect larvae.

Many holly trees have large dead limbs still attached to the living tree. These sizable limbs are often vertical, or near vertical, and easy to dislodge (all they often require is a sharp shove to dislodge). The more vertically aligned deadwood is, the drier it usually is (sheds rain better).

Large, dead holly branches can be easily broken into shorter lengths by bashing the dead branches over something hard e.g. a large rock/boulder. No sawing or axe sectioning is generally required. However, be careful when forcefully breaking large branches as they can jar the hands when struck or break upwards – hitting an individual in the face.


3. CARVING WOOD
Dense, smooth and often of clean, ivory-white colour – the wood is exceptionally attractive.

Although the wood can be hard to carve, it holds a hard-wearing edge and is an ideal choice for robust carving projects, be warned – the wood can be prone to splitting at the ends when dried too quickly.

It’s important that holly wood has been dried (seasoned) gradually, especially if you are planning on using the wood for important carving projects, such as a knife handle.


4. FEATHER STICKS
Admittedly, holly is not a first choice wood for feather sticks.

It’s hard to acquire sufficient lengths of holly wood that is knot-free. Also, dead holly tends not to yield long, multiple-curled shavings when carved.

However, it’s possible to make small feather sticks from holly – it’s just that more of them are required to make a large enough mass of curls for a sure-thing fire in damp conditions – anything between 4-8 feather sticks, even more.

How many feather sticks is exactly needed depends on your feather-stick making skills and the quality of the holly wood that you are using (make sure to make plenty of thin splints as well!).

So, why bother making inferior feather sticks from Holly? There are deciduous woodlands that have a vigorous understory of holly with few other tree species present. In those instances, holly can be the best feather stick choice and since bushcraft is very much about expanding our skill sets for all eventualities…

5. FLAMMABLE BARK
Birch is not the only deciduous tree in town that has flammable bark.

Mature holly trees, especially standing, dead holly trees, sometimes shed a peeling bark that is flammable – certainly not as flammable as birch bark, nor does holly bark come off in the same copious quantities as birch bark – but off it comes, and it's flammable – and can give you a fire-lighting edge when you need it.


6. BOW DRILL LUBRICANT
The leaves of holly, when crushed, are fantastically waxy.

Holly leaves make a first-class lubricant for the handheld (bearing block) of the bow drill.

Personally, I admire the way my drill spins in the handhold when lubricated with holly leaves. Makes drilling a lot easier which enables me to spin my drill as fast as possible with less effort.

Seriously, I’ve found holly leaves to be a great bow drill lubricant and so will you?

Occasionally, I will put a few holly leaves in my backpack when the opportunity presents itself – just in case I decide to make a bow-drill fire in a location where holly trees are absent.


7. STRAIGHT, STRONG BRANCHES
Not a whole lot of deciduous tree species naturally produce straight branches.

Of course, some tree species when coppiced, such as hazel and sweet chestnut, produce an abundance of straight branches. Un-coppiced holly is generous in its gift of straight branches.

Strong, long and tough – the straight branches that grow as secondary growth on the larger branches or a basal growth at the bottom of the main tree trunk have multiple, potential uses – shelter construction, throwing sticks, batons, digging sticks, arrows, walking staffs, spring traps and pot suspension are just a few applications for the straight, tough and long branches of holly.

It’s not hard to see why, historically, holly branches were once used for making spears and chariot axles.

Straight and strong branches growing from the base of a holly tree. Holly branches are also quite elastic 

8. SHELTER
An unusual application of holly. The dense, evergreen canopy of holly can provide a discreet, well-sheltered site.

Many holly trees have a canopy that reaches close to or to, the ground. Such trees are great for wildlife observation, or as a sheltered spot for sitting out inclement weather (while getting a quick brew on) or as a discreet camping site.

Just be mindful of the spiny leaf litter of hollies – some form of barrier is required to comfortably sit or lie under a holly tree. Alternatively – clear away the holly leaf litter from under the tree.

Bonus: the thick evergreen canopy of holly tends to disperse campfire smoke very well – important if you want to maintain a low-impact presence in an area.


9. LEAF LAYER OF DEBRIS HUT
The thick, leathery leaves of holly provide great insulation for natural shelters such as the leaf-debris hut and the leaf-debris group shelter.

Rain tends to be shed off more efficiently from a shelter cocooned in holly leaves. Gathering the spiny, holly leaves can be challenging – usually, some form of hand protection is required.

However, where there are holly leaves there are obviously – holly trees, so making a nice, natural shelter under a benevolent holly canopy can provide additional weather-buffing.


The dense canopy of holly trees can provide a surprising amount of shelter

THINK FOR YOURSELF


WHY YOU SHOULD CONDUCT YOUR OWN BUSHCRAFT EXPERIMENTS


The above list of 9 bushcraft uses of holly is certainly not a comprehensive list of all bushcraft uses associated with holly.

It’s my hope that you create your own list of bushcraft uses for the holly tree – through your own bushcraft experiments.

Of course, it’s important to avail of training courses, advice, research and experience as regards progressing your bushcraft knowledge, skills and experience.

It’s also vitally important that you draw your own conclusions from your own observations, deductive reasoning and experiments.

A key asset of any serious bushcrafter that actually spends a lot of time outdoors is fostering your own ingenuity – that you strive to acquire the confidence and get-go attitude to create and improvise for yourself.

Learn to trust your own ideas, and test them (as safely as possible). If they fail, so what? At least you tried and learned something about what works and doesn’t work.

When you succeed you will plant a seed of confidence in yourself to trust your own observations.

This is important.

Books, training courses, other sources of valid bushcraft information etc. will only get you so far.

Wild places are variable at the best of times – they demand a flexible mindset to overcome some of the inevitable challenges that wild places will occasionally throw at you.

This is especially important if you plan on visiting, alone or with a group, wilderness areas. It’s also important in survival scenarios.

Besides, figuring things out for yourself can be surprisingly satisfying – even fun. Whether it's experimenting with unusual bushcraft applications of holly, or modifying a natural shelter design – it's important that you occasionally flex and strengthen your ability to try things differently – on your own terms.

The art of applying competent, safe and novel ideas in a bushcraft setting, is a practice that improves with regular application. I will explore this theme more fully in a future article, so keep tuned . For now, I hope you enjoy becoming (re)acquainted with a fantastic bushcraft tree – holly.


HELP PRESERVE THE HOLLY


Finally, I’m going to briefly step onto my environmental soap box and share a message I think is important.

In many places, there has been a serious decline in female holly trees due to the custom of cutting down berry-laden holly branches for Christmas.

Often there is a disproportionate ratio of male to female holly trees with male trees greatly outnumbering female holly trees because of a local decimation of female holly trees.

If you are considering collecting holly berries, please refrain from doing so. Wild berries serve a much more vital function in nature – certainly more important than human decoration. The true Bushcrafter cares about nature and tries, when possible, to enhance a woodland rather than unnecessarily deplete its natural resources.

As a holly substitute consider the foliage of invasive tree species, such as cherry laurel, Prunus laurocerasus, and rhododendron, Rhododendron ponticum. Although both species lack red berries, the foliage is certainly pretty enough for Christmas wreaths. You will also be helping to control an invasive species.

References:  

(1), (2) & (3):  Trees of Ireland, Native and Naturalized, Nelson, E. Charles and Wendy F. Walsh.


Tuesday, 13 December 2016

Plant Lore: Stinging Nettle

When you find one nettle you often find many others

Stinging Nettle – A Great Gift of Nature
Discover the Many Outdoor uses of Nettle


“Gently touch a nettle and it’ll sting you for your pains
Grasp it as a lad of mettle and soft as silk remains”.

Sean O’Casey, Playwright.


The stinging nettle has a long history of usage by humankind – as far back as prehistoric times.

It’s hardly surprising there is a large body of folklore, as well as traditional uses, associated with the humble nettle.

Widely distributed, generally abundant, a source of medicine and nourishment as well as a source of natural cordage – the stinging nettle is of nature’s great gifts.

A plant well worth befriending…


Nettle Sayings


“Nettle in, Dock out”  – A belief that the leaves of dock plants (Rumex spp.), when crushed, will release a juice that provides relief for nettle stings.

“To Grasp the Nettle” – To force yourself to be brave and do something that is difficult or unpleasant.

To ‘Nettle’ Someone  – To pique, irritate, vex or provoke.

Nettle Facts


Common name:    Stinging Nettle

Identification:     Upright, herbaceous plant with opposite, hairy, heart-shaped, toothed leaves. Green flowers in long, branched clusters springing from axils of leaves. Adapted for wind fertilization.

Scientific name:    Urtica diocea (Genus name, Urtica, is derived from the latin, Uro, to burn)

Alternative names:     Nettle, Greater Nettle, Common Nettle, Burn Weed, Burn Hazel, Burn Nettle.

Irish name:     Neantog (pronounced Neean toag), (Scottish name: Deanntog).

Family group:     Urticaceae (about 500 species worldwide, mostly tropical).

Distribution:     Vast geographical range.

Stinging nettle is a tenacious coloniser of great swathes of the Northern Hemisphere and is abundant throughout Northern Europe, North America and much of Asia.


The fine, stinging hairs of nettle


Nutritional Value:     Exceptional. Vitamin, mineral and protein rich. Most notably high in iron and protein (can be a whopping 25% dry weight).

In short, nettle is a nutritional powerhouse – and well worth adding to your outdoor diet for overall health and well being.


Simple Nettle Recipes:     Both the roots and leaves of nettle are edible.

Nettle Tea: Place 1-2 finely chopped nettle leaves into a cup. Fill cup with boiling water. Allow to steep until cool enough to drink.

Nettle Root Powder: The root, when thoroughly dry, can be sliced thin, then ground into a sprinkling powder and used as a nutritious condiment for outdoor dishes. Can be stored as a long term food.


Medicinal Uses:     Anaemia, constipation, allergies, chest infection, blood tonic…(there are many more).


Outdoor Cosmetic Uses:    because nettle is so nutritious it can be used as a hair tonic. Simply steep a palm-full of chopped nettle leaves in hot water. When water is cool, rinse hair through nettle-infused water. Great for extra lustre and thickness of hair (sadly not a concern for my balding head).


Nettle Cordage:     The tall fibrous stalks of nettles can be processed into an excellent string – certainly strong enough for fishing line and shelter bindings 


Selecting the Best Nettle

The peculiar Habitat Preference of Stinging Nettle


Nettle grows best on fertile, deep, moist soil that is partially shaded.

However, nettle can grow on open, dry soils.

The difference in texture and appearance between nettles that grows in the open and in partial shade is striking.

Nettle that grows on damp, fertile soil generally has leaves that are generally larger, softer and better tasting than the usually dry-textured, smaller leaves of nettle that grow in the open.

Nettles from damp, rich soils are usually taller – making them a good choice for string-making.


Learn 2 Quick Ways to Eat Nettle


1. Eating Raw Nettle

Eating raw nettle is a great, quick way to obtain a filling, nutritious snack to stave off hunger pangs when outdoors.

Who needs shop-purchased snacks when surrounded by a wholesome plant like nettle?

How to Eat Raw Nettle in 5 Easy Steps

1. Gently grasp the under surface of a nettle leaf (most of the stinging hairs are found on the upper surface). If in doubt cover your fingers.

2. Cut the leaf free, by slicing through the leaf stalk.

3. Begin to fold leaf over – from the under surface only.

4. Keep folding and pressing leaf – this action will crush and neutralise the stinging hairs of the upper leaf surface.

5. Make sure all the stinging hairs are crushed by repeatedly folding.

Pop into mouth, chew and enjoy.

Warning: do not select nettle that is frequented by domestic dogs – there is a small chance that domestic dogs will urinate on nettles. If in doubt, select uppermost leaves from tall nettles (that are above dog-pee level, usually 2 feet and above).

2. How to Wilt Nettle in 3 Easy Steps

Wilting nettle leaves over a campfire not only neutralises the stinging hairs but can impart a pleasant, slightly roasted, crunchy texture to nettle leaves.

1. Rub the base of nettle stalk with the back of your knife or with a stick – this action will rupture and neutralise the delicate, toxin-filled, stinging hairs.

2. Cut the nettle free at the smoothed section of the base.

3. While holding the stalk base – pass the leaves over the heat of a campfire – this action will quickly wilt the leaves. Wilt the leaves until the preferred texture is acquired. Be mindful of passing the nettles too close to flames as this can burn the leaves too much. Be thorough – make sure all the stinging hairs of the leaves are neutralised by heat from the fire.

When thoroughly wilted – eat heartily and enjoy.


Top Tip


Dead Nettle Stalks as Tinder & Kindling


Each autumn, wild patches of nettle can be seen wilting, eventually dying.

The dry, hollow stalks of dead nettle make an exceptional tinder or kindling for starting a campfire.

Even during wet weather – cracking open the stalks lengthways – into long-as-possible lengths and exposing the dry interior of these stalks to a flame will greatly increase your chance of igniting a campfire during foul, wet weather.

Even during the colder months of autumn and winter – nettle keeps on giving…


Finishing Thoughts

Next time you are on a wander through a patch of wild land – and you stumble across some nettle – consider taking a break.

Maybe light a small fire, cook up some nettle and relax.

The more wild edibles you can sustainably harvest from different habitats the more connected you will become to these places.

It’s a big part of improving an individual’s bushcraft skills.

It also imparts a sense of belonging to wild places.

There is a large range of skills and knowledge associated with bushcraft. This is a good thing – because a range of bushcraft skills and knowledge is required – when living outdoors on self-propelled excursions with minimal equipment.

But bushcraft is not just about technical mastery.

Bushcraft is also be a means of emotionally connecting with wild places – places that can encourage a sense of gratitude for what nature can often generously provide.

The nutritious, medicinal, utilitarian and generally common stinging nettle is a strong example of what nature can generously provide.